
|
Decibel Dungeon
|
|
This is one of the first questions that arises (or should be) when anyone is considering the possibility of building or modifying their own electronic equipment (particularly if it is to be mains operated), so let's answer it first.
|
|
There are two issues here, personal safety, and damage to property, either the equipment you are building, the equipment which it is connected to, or God forbid, damage to your home.
|
|
There is virtually no danger of death or injury while you are building or modifying an electronic project. The potential danger comes when you connect the item to an electricity supply if you haven't strictly followed all the rules on safety. However, if you make sure that you have properly grounded any part of the equipment which could become live (especially metal casings), there should be no danger of electric shock when operating it.
|
GROUNDING - Connected to 'earth' so that any electrical current is conducted straight to ground, rather than through something else like you. (Due to the ground connection having a lower impedance which currents 'prefer' to flow through).
|
|
Sometimes you may need to test parts of a circuit while it is operating. This will necessitate having the case open. Again, providing you have followed the rules on grounding, and have correctly insulated any parts of the equipment carrying high voltages (particularly the power supply section), you should not encounter any safety problems.
|
|
As regards damaging the equipment (or anything which is connected to it), the answer is once again to make sure that you have done everything correctly. Here is a list of safety checks which you should carry out at least twice before you connect up anything you construct to a power supply:
|
|
Make sure that you have installed the correct fuses or circuit-breakers in the correct locations.
If you designed and made the PCB, make quite sure that it is correctly laid out. Make sure the tracks are not broken and that there are no unwanted connections.
|
PCB - Abbreviation for Printed Circuit Board. The board on which electronic components are mounted to build a circuit.
|
|
Check all your soldered joints and make sure that you have not created any 'solder bridges' between parts of the circuit which are not meant to be connected to each other.
|
SOLDER BRIDGES - An over-application of solder that has flowed across two or more tracks causing an unwanted connection between them.
|
|
Make sure that there is nothing in the equipment which could cause a short circuit. eg a piece of wire or leadout.
Make sure that all the components have been inserted into the correct locations.
|
LEADOUT - the wire connection (usually two or three) coming from an electronic component which is soldered to the PCB (or sometimes to another leadout) to connect the components.
|
|
Where relevant, make sure that components are inserted with the correct polarity.
Check that all components are rated for the voltage in their part of the circuit.
Before connecting a power supply to the rest of the equipment, measure its output voltage to ensure it is as expected and specified for that circuit.
|
|
Always test any new or modified piece of equipment before connecting it to other parts of your hi-fi system. Check that there is no DC voltage on the output terminals. The (music) signal will be AC and you should not be able to measure more than a few millivolts of DC with your multimeter.
|
|
Don't be frightened off by all this talk of safety. While it is a very important consideration of DIY hi-fi, I should say that in four years, I have had no major disasters. That's not to say that, like most people who build or modify electronics, my heart doesn't flutter a bit each time I first power up something I've just built, and if you don't feel the same, then you probably aren't giving electricity enough respect!
|
| Site menu
Page menu
|
|
|
It may seem a bit ambitious to ask anyone starting out in DIY hi-fi to consider actually building something themselves. However, once you have learned the comparatively simple skill of soldering, there is little to prevent you building one of the many hi-fi kits available.
|
Click HERE to learn about soldering.
|
|
It would be exaggerating to say that kit building is always easy, and in any case, each kit ranges in complexity, depending on its size and function when completed.  There are a number of fairly simple items which the beginner could start off with, items like crossovers have relatively simple circuits and few parts. It's surprising how successfully completing a basic kit, like this 1watt amplifier, gives you the confidence (and experience) to go on to more complicated projects. There are a number of fairly simple items which the beginner could start off with, items like crossovers have relatively simple circuits and few parts. It's surprising how successfully completing a basic kit, like this 1watt amplifier, gives you the confidence (and experience) to go on to more complicated projects.
|
|
The first piece of equipment I built was a passive preamplifier. Consisting of an input selector, tape switch and volume control, there was very little for me to do except build these items onto a chassis, connect them together and put the whole lot into a case. However, the satisfaction that this project gave me, encouraged me to go on to more ambitious projects.
|
PASSIVE - An electronic circuit that does not use extra power (added electrical current) to modify the signal.
Or an electronic component which does not amplify the signal, eg resistor, capacitor, diode etc.
|
|
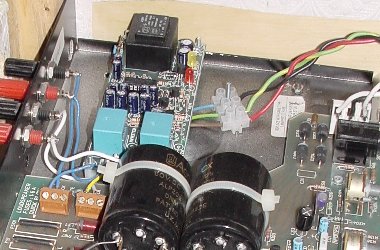
Loudspeaker protection module in amplifier (built from kit)
Velleman no longer produce the above kit but you can get a similar speaker protection module from Quasar Electronics.
My next 'build' project was a kit to build some loudspeaker protection modules. The kit came with all parts to complete the circuit and full instructions. Before you start actually building any kit you should:
- Read the instructions at least a couple of times.
- Identify all the various parts.
- Become familiar with the circuit board layout.
- Do a 'dry run', making sure that each component will fit where it is meant to.
Do all the above before you even turn on the soldering iron and the job will go much more smoothly. Remember, this is a hobby and you are meant to enjoy it!
|
|
Building any kit (or doing any work of a similar nature) will be even less problematic if you observe the following tips:
- Make sure that you have a clear work area where you can work comfortably. Ensure that there is adequate lighting.
- Have a suitable container handy to put all the smaller components in. An ice-cube tray is ideal. Don't let this container go near the edge of your work surface, it will find a way of leaping onto the floor and spilling its contents.
- Don't rush the job. I know from experience that there is a natural desire to get new projects working ASAP. But DIY hi-fi is not like going out and buying a new piece of equipment which you can simply 'plug and play'. Patience is definitely a virtue with DIY hi-fi.
 - the first time I worked on my CD player, I was using it as the main source component in my system and listened to it every day. This put pressure on me to do the modifications as quickly as possible and made the job a bit stressful. Then I got hold of another CD player to use as a back-up and the next time I worked on my 'best' CD player, I was not worried about having nothing to listen to in the evening. Consequently, I found it less stressful and wasn't tempted to hurry the job. - the first time I worked on my CD player, I was using it as the main source component in my system and listened to it every day. This put pressure on me to do the modifications as quickly as possible and made the job a bit stressful. Then I got hold of another CD player to use as a back-up and the next time I worked on my 'best' CD player, I was not worried about having nothing to listen to in the evening. Consequently, I found it less stressful and wasn't tempted to hurry the job.
- If you don't have a fumes extractor, make sure that you work in a well ventilated area and don't breath in the fumes from your soldering iron.
- If your kitchen has a cooking hob with an extractor canopy, build a platform over the hob and use that as your work area. The extractor will take away the fumes from your soldering iron.
Kits fall into three categories:
- Kits sold by third parties who usually supply a complete range of electronic projects, not just hi-fi.
Look for these kits from suppliers like;
Maplins.
Quality kits..
Audiokits (USA).
Options range from simple power supply circuits to amplifiers, and include many useful 'add-ons' like the loudspeaker protection module mentioned above.
- Kits sold by individuals based on their own hi-fi designs
The big advantage of these kits is that the person who designs and supplies them is usually available to help and advise on any problems you may encounter while building the kit. Some offer a complete kit with all the parts to build a finished item, some offer just the PCB and plans. Many offer a choice. For examples of this type of kit have a look at the ESP site.
David White (White Noise) has a good range of high quality kits(see link below).
.
- Kits sold by hi-fi manufacturers who offer the hobbyist the option to build their own equipment and save money on the ready-built item.
Again, you are likely to get some help when you choose to build one of the kits in this category. For examples of this type of kit have a look at:
Borebely Audio.
Marchand Electronics.
White Noise.
I should also mention that for those who don't trust their soldering skills, Avondale Audio supply ready-built modules that you can use to build hi-fi by simply connecting them together and putting them in suitable housings.
|
|
I can't conclude this section without mentioning the excellent 'ESP' audio site run by Rod Elliott. This is undoubtedly one of the best audio DIY sites anywhere and should definitely be on your 'Favorites' list if you are interested in building some hi-fi.
|
| Site menu
Page menu
|
|
|
What exactly do we mean by 'building from scratch'? We could mean designing something all by yourself and then building it. Even then, you may be using parts which are already built. For instance, you rarely find people who will make their own mains transformers. In this section I shall use the term to mean producing something for hi-fi that is not bought as a kit.
|
|
The truth is that a beginner in DIY hi-fi (without knowledge of electronic theory) is extremely unlikely to have the knowledge to design something them self. I have not yet reached that stage after four years, and quite a bit of experience of modifying and building hi-fi. However, I have built electronic circuits which have been designed by others, including making the PCB's, and I hope to show you that this is not too difficult.
|
|
|
|
There are several methods of producing a PCB, one of which can be easily used by the hobbyist working at home. The method involves marking out the tracks on a piece of board which has a layer of copper on one side. These tracks and any other area of the copper which are to remain on the finished board are masked, either with ink from a special pen or with transfers made for the purpose. The board can then be immersed in a ferric chloride solution where the unmasked areas of copper will be dissolved away.
|
TRACKS - The conductive (copper) strips on a PCB which link the various components of the circuit to each other.
Usually made from copper which is left behind after a PCB is chemically treated to remove the 'unwanted' copper.
|
|
As regards drawing out the circuit, you can do small circuits by hand. Larger circuits will be best handled using one of the many computer software programs available for that purpose. Sometimes you will be lucky and have access to a template for the circuit which you are building.
|
|
- when making a PCB which will contain any IC's, do not separate the areas between each pin. After etching, the track joining adjacent pins can be (carefully) cut using a craft knife. If you make the PCB the usual way, you will find that the very small 'islands' for each IC pin get dissolved away.
|
IC - stands for Integrated Circuit. These are electronic devices that contain a number of miniaturized components making up a circuit that is designed to perform a certain task, eg amplifier as in the case of OP-AMPS. You can recognize them by their two rows of legs, often 8 or 14 in number.
|
|
If you are interested in trying this out for yourself, start with a simple circuit like an electrical filter or a board to mount some switches on. I use a bit of perforated strip-board (covered with a plain paper label) to temporarily mount the components on while I determine the best layout.
|
STRIP-BOARD - A board perforated with a grid of holes and with rows of copper tracks on one side. Used to build prototype circuits.
|
|
When I have got everything fitted in neatly I can then draw the tracks (on the label). If something needs moving it is not difficult to rearrange the components and redraw the tracks. The tricky part is to then transfer the layout design to the underside of the PCB where it will be inverted. This can be a little confusing, especially in 'crowded' parts of the circuit.
|
|
The design (on the copper side of the PCB) is protected with etch resistant ink pen or PCB transfers. The latter are transfers specially produced for the job of making PCBs. Some people have reported good results by going over the circuit design using a fine brush and enamel paint.
|
|
The board can now be etched to remove the unwanted areas of copper. Place the etching solution in a suitable plastic tray, the sort of thing that photographers use for developing photographs. I usually work in my stainless steel kitchen sink but where-ever you choose to do this job, remember that the etching fluid is a strong corrosive and be very careful as regards spillages or getting the solution on yourself.
|
|
Pour enough solution into the tray to enable the board to be completely covered. Carefully place the board into the solution and gently agitate the solution to help carry away the particles of copper as they are dissolved. Depending on the strength of the solution and the design, you will eventually find that the unmasked areas of copper have been completely removed from the board. At this stage remove the board using plastic tweezers. Allow any solution on the board to drip back into the tray.
|
|
The next stage is to wash the board in hot soapy water using a plastic scouring pad. The etch resistant ink or transfers must be fully removed (or they will interfere with the soldering process). Finally, rinse the board in clean water and dry it using kitchen towel.
|
|
The last operation is to drill the holes through which the 'legs' of the components will be placed. A small electric hobby drill and some very small drill bits are required for this job.
|
|
If everything has gone well, and there's not much reason why it shouldn't have) you should have a PCB on which you can assemble the necessary parts to make up your circuit. Like many of the other skills in this hobby, you will find that you get better with practice. Beginning with some simple PCBs will stand you in good stead for when you need to make something more complicated.
|
|
If you do fancy having a go at making a PCB, I can thoroughly recommend purchasing the 'Student Etch Pack' from Maplins (order code GT07H). This contains boards, etching solution, a tray and etch resist marker pen, everything you need to make a PCB up to 203MM by 102MM.
|
|
Finally, here are a couple of links if you want to find out more about making your own PCBs.
More advice on making PCBs.
Dynaart A very informative site detailing the many different methods of making a PCB and offering some suggestions for making the job easier.
|
| Site menu
Page menu
|
|
|
Building the electronic circuits which make an amplifier or other piece of hi-fi is only part of the job of producing something that is both functional and aesthetically pleasing. Many small hi-fi manufacturers will tell you that the electronics are comparatively easy and it's the casework and ancillaries that eat up their time and budget.
|
|
If you look at the prices charged for an off-the-shelf metal case of suitable dimensions to house domestic hi-fi, you will see that they don't come cheaply. Ask for a quote on having something built to your specifications and you are liable to become quite despondent. And that's if the supplier even agrees to do a 'one-off' for you. So if you are on a tight budget, the casework is going to be up to you to produce.
- there's another solution which won't break the bank. Everyday, hundreds, or maybe even thousands of items of hi-fi stop working. Some will get repaired, but a majority will be scrapped. A trip to your local refuse disposal depot will probably yield a good selection of this 'dead' hi-fi. You will be quite unlucky if you can't find a case with similar dimensions to the ones you are looking for. You could also ask at shops where they repair hi-fi as they often get repair jobs which are not viable and the item concerned is just thrown out.
You may have to pay a small price for a piece of defunct hi-fi or you may be lucky and get it for nothing. In either case, all you have to do is get it home and gut it. As a bonus, you are likely to find some useful items inside: transformer, transistors, sockets, switches, fastenings etc.
|
|
Once you have gutted your 'new' case look at the front and rear of the case and see if they will need modifying to accept the controls and socketry of your new creation. Sometimes you may need to cut a section out of the front or rear panels, replacing them with sheet metal or plastic, drilled to accept your new knobs, switches and sockets.
|
|
While you have the empty case, take the opportunity to see if you can improve it. If you think that the case could do with some strengthening, then now is the time to do it. Also, damping material should be added, especially to the base and lid.
- My preference for damping casework is the self-adhesive flashing sold by builders merchants for repairing a leaky roof. I find that this works out cheaper than buying the sound deadening panels used in the automotive industry (and much cheaper than damping materials sold specifically for hi-fi).
|
|
Deciding on which sort of finish you want is all part of the fun of 'building-it-yourself'. Very acceptable results can be achieved using aerosol spray paint for the metal casework. An attractive fascia can be produced from a variety of materials. Polished hardwood is quite popular, brass or stainless steel can look great. 'Rub-on' lettering (such as 'Letraset') can be used to add labels and a name. A clear coat of lacquer will protect the lettering against occasional cleaning.
|
|
Control knobs and switches are also important. There are not many really attractive options for knobs available from the component suppliers. The plastic ones look cheap and the aluminium ones are quite plain.
- I have used the metallic caps from deodorant aerosols, modified to accept spindles. An alternative is to mould knobs from casting resin.
|
|
 A home-made knob using a cap from an aerosol.
|
A wooden plug is glued inside the cap and a 6mm aluminium rod inserted into it. The other end of the rod is connected to the control shaft of a rotary switch using a coupler made from the brass insert of a 30 amp terminal block.
|
|
|
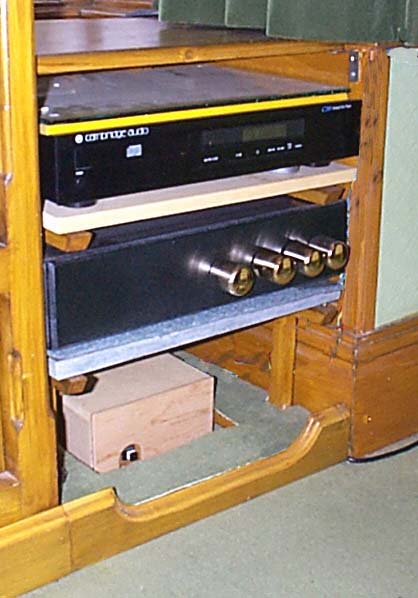
The preamp beneath the CD player sporting the home-brew knobs. Note the separate transformer housing.
|
|
- by using extension rods you can place the rotary switches to the rear of your equipment and keep internal wiring to a minimum.
|
|
Another option is to make some knobs from wood! And before you say, 'but I don't have a lathe' let me tell you that nor do I! But I do have an electric drill and sandpaper is not expensive. Here's how.
- First you need some suitable wood. A length of square section is best. Some woods are better for this application than others but I have had success with mahogany, cedar and yew so far.
- Take the length of wood and sqare off one end with a mitre saw. Now mark out a square, with the sides the same dimensions as the width/thickness of the wood that you are using. With a knife blade, draw in the diagonals so that you have the exact centre of the square.
- Use a pair of compasses to mark a circle that just fits in the 'square'.
- Now using a centre punch, mark the centre.
- Cut off the 'square' from the length of timber.
This is what you should have before you start to shape and drill.
- Using which ever method you prefer, roughly cut out the circle that you drew with the compasses.
- Now you will need something for a shaft, aluminium rod is ideal about 1/4 inch (6mm) diameter. Cut a length about six inches (150mm) long with a hacksaw.
- Using a suitable drill (practice on a bit of scrap wood), drill a hole where you marked with the centre punch so that the shaft will be a very tight fit. It is best to use a drill stand to make sure that you get the hole absolutely vertical. Make sure that the hole does not go right through the piece of wood!
- I usually file a chamfer on the end of the rod so that it will be easier to drive it into the wood. Tap the rod in gently with a piece of timber or small hammer.
- Now the fun part part! Place the other end of the rod in an electric drill. Hold the drill in one hand and some coarse sandpaper in the other.
Wear a stout glove in the hand holding the sandpaper - it will get quite hot!
- Start the drill and use the sand paper to shape the wood into a circular knob shape. You could shape it any way that you fancy.
- When you have the shape you want, continue with finer sandpaper to produce a good finish.
- Finish the knob with varnish, wax or Danish oil.
- Trim the shaft to the right length to connect to your volume control shaft (or what ever rotary switch you are using).
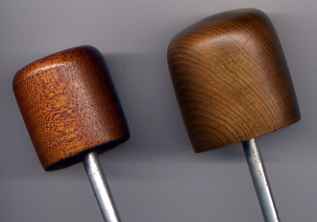
Wooden knobs, made at home without a lathe!.
|
|
I hope that this has given you some ideas for making your own hi-fi at least look more expensive, even if it doesn't sound it. It doesn't have to cost a fortune so you can afford to change the look if you later decide that you can't live with your first attempt. Hi-fi DIYers with a spouse or partner will know just how important it is to get things looking right!
|
| Site menu
Page menu
|
|
|
|
|
For this section, I will have to confine my advice to buying components for those of you living in the UK. If anybody from another country wants to compile a similar section, I will be happy to include it here too.
|
|
The sad truth is that it is getting to harder to buy electronics componets in the UK from the hobbyists point of view. The larger suppliers like Farnell and RS make things difficult with either minimum order requirements or expensive handling charges for small orders. Maplin, once a great source of everyhthing for the electronics hobbyist has drastically cut its lines as it mves to selling ready-made electronics items and computer equipment.
|
|
So, here are the options:
- Farnell - a large world-wide company. Usually better prices than RS. Minimum order of 20 UKP (before VAT). Large range and quick delivery. Request a (free) CD catalogue and you can browse at your leisure and even make up your orders offline.
- CPC - a branch of Farnell aimed more at the hobbyist. Smaller minimum order quantities but higher prices and limited range. Orders over 30 UKP are shipping-free.
- RS (formerly Radio Spares and not to be confused with the US company Radio Shack) - Another large company with a huge range of components.
- Maplin Electronics - still have some useful electronic components but watch out for shipping costs unless the order is over 30 UKP.
- Cricklewood Electronics - a smaller company specialising in those harder-to-find parts like obscure transistors. No minimum order charge and they keep their shipping costs reasonable to.
- Rapid Electronics - I find it difficult to locate items in their catalogue but list them here as an alternative.
- Audiocom - a small company specialising in the more exotic components but fairly expensive.
- The Hi-fi Collective - another smallish source of hi-end components.
- Strachan Electronics - another smallish source of hi-end components and hi-fi bits and pieces.
- Greenweld - offer surplus electronic items. Often worth a look but shipping costs will inflate prices on small orders.
Well, that's not quite all because recently I discovered a new company called Fast Components. FC are putting together component kits; and by buying from the Far East are able to keep their prices very competetive.
|
| |
|
They tell me that they are interested in the DIY hi-fi market and are hoping to put together a range of useful parts kits. Why is this useful? Well, if you buy stuff from Farnell like I do, you will see that for items like the good old 0.25W metal film resistor, there is a minimum order quantity of 50. So, if you want to buy in enough different values so that you have the correct one for most situations, it is rather expensive. You can buy kits form Farnell and RS but these work out quite expensive. Fast Components kits have fewer resistors but will enable you to have a wide range of values on hand. Belive me, there is nothing more frustrating than finding that you cannot complete a project for the want of a couple of resistors and you have to place a 23 pound order with Farnell just to get those resistors.
|
| Site menu
Page menu
|
|
|
If you're planning to build some hi-fi electronics, one of the best places to find designs is the excellent ESP site.
More circuits and plans can be found at the Audiocircuits site.
If you fancy building a complete system, have a look at Jim Read's site.
The Leach Amplifier site has comprehensive details on building a well-proven design.
How about building a CD player? See A Galavotti's 'recipe'.
Building your own power supply? Then you must read this article by Mark Hennessey.
|
| Site menu
Page menu
|
|
|
|
|
