|
Decibel Dungeon
|
|
|
|
You cannot surf around the DIY hi-fi sites without being intrigued by certain projects purely because of their apparent simplicity. The Gainclone chip amplifiers are one such example. Another is the NOS (non-over sampling) DAC using the 1543 DAC chip and the CS8412 receiver chip.
|
|
Having seen any number of designs based on the above chips, I was keen to see if their performance would give the sort of improvement to my system that I had experienced with the introduction of the Gainclone amps. However, as simple as these circuits may be to those experienced in digital electronics, they are probably beyond the skills of the complete beginner like me. Fortunately, there is an alternative to starting from scratch, and that is to buy a kit from Scott Nixon.
|
|
Scott has been designing and building this type of simple DAC for many years now and the sheer number of kits that he has sold is testimony to the quality of his products. There is even a choice of kits for the DIYer ranging from bare PCB's to fully assembled DAC's so there really is something for everybody and all at extremely competitive prices when you compare the finished item to other DAC's, especially those sold commercially.
|
|
I looked at all the options on the Scott Nixon web site and decided on buying a kit of parts to build the basic DacKit. This decision was made partly on cost consideration and partly due to the fact that I didn't have to draw up a shopping list and hunt out all the components. As a bonus (a big one) Scott supplies the PCB's with the 1543 and CS8412 chips already soldered on. In my case these were surface mount items with tiny pins and I was very glad that I didn't have to do the job myself!
|
|
I also decided to pay the extra 15 USD for Scott to fit the tiny circuit that provides the facility to alter the absolute phase of the output. This is useful for system matching and also for some CD's which may have been recorded with the phase inverted.
|
|
As you will see if you go to the web site, Scott also offers the DAC with a valve output buffer or a buffer using high quality video opamps. I personally think that offering this range of options is a wonderful service, allowing to DIYer to choose exactly what he wants.
|
| Site menu
Page menu
|
|
|
|
|
Scott extends his options policy to the ordering process that provides plenty of options to pay, although buyers outside the US are restricted to Paypal. As an existing Paypal user, this presented no problem for me but if you have not used Paypal before, be assured that it is an easy and safe method of payment using your credit card.
|
|
Once you have chosen exactly what you want to buy, the best thing to do is to email Scott with your requirements and get a price. Payment can then be made very quickly through Paypal (or other methods if you live in the USA). Then it's a matter of waiting for Scott to complete your order. Being a one-man company, there is bound to be a slight delay in sending orders but to his credit, Scott had my order off to me within the two weeks that he quoted. Delivery is by UPS and my order arrived safely a few days after despatch! The parcel was professionally packed and arrived in good condition.
|
| Site menu
Page menu
|
|
|
|
|
I would suggest that you use the time that it takes for Scott to get your DacKit to you to do some preliminary work like obtaining a suitable power supply and building some sort of housing for the DacKit.
|
|
The power supply required is a simple 12 volts DC which should be able to supply a minimum of 80 mA in current. It could be a plug-top type or you could build one with a transformer, rectifier, and regulator. I was lucky in having a high quality PSU that was originally designed to power a Superclock (CDP upgrade). By changing the transformer and a trimpot on the output, I got a PSU that Scott described as a 'most excellent pre-reg'!
|
|
Another possible source of this PSU is 'old' equipment. Ironically, when I stripped down an old Pioneer tuner to use the case, I found the PSU put out 12 VDC and I could have used that without even removing it from the case! Well, it won't be wasted as I am posting it on to another DacKit builder.
|
|
The case can be almost anything that you want. The PCB is tiny so the main consideration as regards the size of the case is whether you want or need to include the 12 volt power supply. In my case the PSU fitted in the old tuner case with room to spare so in it went! The only extra items not supplied in my kit were the three phono sockets and the internal wiring (I used CAT 5 solid core). I also bought a switch to enable me to switch the phase, and an on/off power switch.
|
|
My case was 'finished' with an oak panel at the front and looks quite reasonable considering this is a temporary arrangement. I may even house the DAC inside my CD player, eliminating the need for the interconnect!
|
|
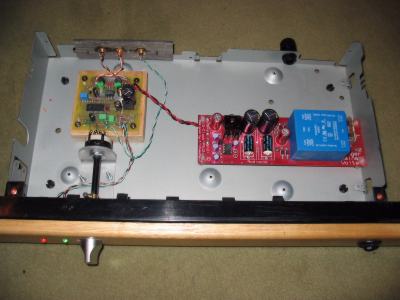
This pictures shows the PSU module (right) and DacKit module in the converted tuner case. (No, I am not in league with the devil! The LED's are relecting the light from the camera flash)
|
|
With the case and PSU complete, I sat back and waited for my kit to arrive. (Actually I didn't as I had several other hi-fi projects running concurrently. There is no peace for the wicked as they say!)
|
| Site menu
Page menu
|
|
|
|
|
As stated above, the DacKit arrived via UPS packaged in a stout cardboard box sporting the familiar green customs label on the front. I opened it carefully and found three polythene envelopes containing the PCB's (with chips soldered on), the rest of the components, and the instructions/paperwork. I suggest that this check is done as soon as possible in order to make sure that everything has arrived safely, rather than waiting until construction begins.
|
|
As with other kits that I have built in the past, at first glance that pile of components looks a bit puzzling but there is no need to worry as Scott has included plenty of help with the kit. Included is:
- A parts list
- A basic schematic
- A (large) diagram of the component layout
- A diagram showing the PCB with tracks
- A diagram showing the external wiring
- If you ordered the kit with the 'phase correct mods', there is an additional diagram showing this mod and the conections for the phase switch
|
|
By looking at the diagram of the component layout, it's quite easy to work out where everything fits. With the soldering iron warmed up, I started to build up the PCB starting with the resistors, then the smaller capacitors, the larger capacitors and finally the two voltage regulators.
|
|
I did make one mistake (due to over confidence and not reading Scott's instructions carefully enough). There are two very small polypropylene capacitors (0.01 uF) that go to the bottom left of the CS8412 as it is shown on the diagram. The diagram also shows two 1000 pF caps on the opposite side of the board (marked 'optional') and I soldered the 0.01 uFs there instead.
|
|
Scott put me right pointing out that the positions on the right side of the board were for optional filter caps and they should not be 1000 pF anyway. It didn't take too long to reposition the caps and that part of the job was done.
|
"Go slow, think ahead, be a happy craftsman". Quoted from the DacKit instructions!
|
|
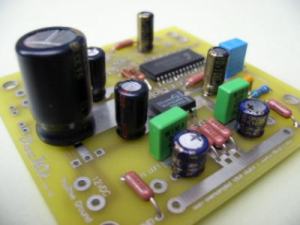
The two green capacitors are the ones that I put in the wrong positions as shown above.

The two blue capacitors to the right of the LED's show where the 0.01 uF (green as supplied in my kit) should go.
The above picture from Scott Nixon's site also clearly shows the orientation of the voltage regulators.
I would suggest using this picture, as well as the diagram in the instructions to help you position the various components correctly but it really isn't too difficult!
|
|
Of course, you may want to upgrade some of the components. However, the only ones that I changed were the output caps which are Black Gate NX types as supplied with the kit. I would have used these happily but I had some NXQ's here that were already burned in, so I used them instead.
|
|
After making a mount for the PCB in the case, the next job was to solder on all the connecting wires using CAT 5 solid core cable for signal wires and stranded equipment wire for the power supply. Having done that, I sat back, made a cup of tea and then took a picture of my pride and joy to send to Scott. It's lucky that I did as Scott immediately noticed that I had rather a long piece of wire from the input socket to the PCB and suggested that I shorten it. Unfortunately, this entailed rotating the PCB 90 degrees and replacing most of the other wires which were then too short. Ah well, Rome wasn't built in a day and it only took 30 minutes to make the modifications.
|
|
By the way, I went for off-board mounting of the LED,s so that I could mount them on the from panel. I also used larger LED's than the ones supplied with the kit simply because I had them to hand prior to delivery of the kit!
|
|
Testing consisted of a quick check of the 12 volt PSU (before connection to the DAC) and measurement of the DC offset which was around 10 mV on each channel and is quite OK. This was one of the quickest projects that I have made, less than a days work for everything including the oak front panel and other case modifications. Scott has really taken heaps of the work out of building this DAC and makes it a comparatively simple even for first-time DAC builders like myself!
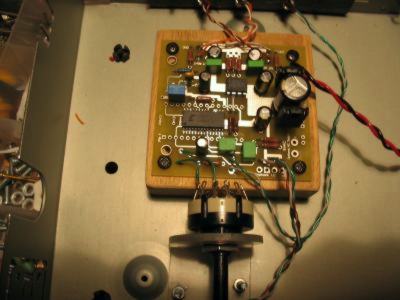
The completed DacKit module wired into the case. The rotary switch is used to switch phase. Please note, after advice from Scott Nixon, the module was rotated 90 degrees so that the wires connecting the module input to the phono socket were significantly shorter.
|
|
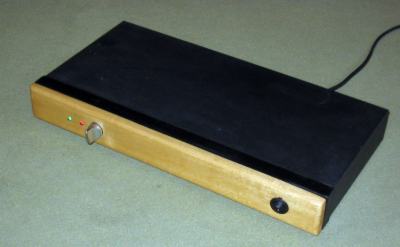
The finished DacKit showing the phase switch and LED's on the oak front panel.
|
| Site menu
Page menu
|
|
|
|
|
I could hardly wait to connect up my new DAC and see what it sounded like (if indeed it made any sound at all). I needn't have worried, as soon as the PLAY button was pressed, the music started to flow from the speakers. The CD was Chris Rea's, 'Road to Hell' album simply because it was in the CDP at the time.
|
|
For those of you unfamiliar with this album, the first track starts with the sound of rain on glass followed by the sound of voices on a car radio. Now, you know that sort of nervous feeling that you get when using a piece of DIY hi-fi for the first time. You are on 'red alert' for any tell-tale signs that something may be wrong. Well, my heart rate went up as I though I heard some odd sounds coming form the speakers. I was about to leap up and power down when I realized that the sound I was hearing was the sound of windscreen wipers. Absolutely clear as a bell and although I had listened to this album many times before, I had not noticed the windscreen wipers previously.
|
|
So a good start for the DacKit. I listened to several more CD's and noticed that the clarity on some tracks was obviously better than on my modified CD723. My opinion so far is that the DacKit is better than the CD723 overall but not by a huge margin (the modified CD 723 is itself a very capable player!). However, I want to reserve final judgment for now as I believe the DacKit may not yet be achieving its full potential. I say this because I have some passive EQ between the DacKit and attenuator and have a feeling that this may be making things a little difficult for the former which like to operate into higher loads than the CD723. So for now, I will just say that in my opinion, the DacKit is a well worthwhile upgrade to most CD players and one I would recommend without hesitation. I will report back here when I have resolved the impedance issue with the EQ circuit.
|
|
Update 25th July 2004
I have beeen listening to the DacKit much more recently having removed the passive EQ section between it and the volume control. Switching back and forward between the Dac and the CD723, it is clear that the DacKit reproduces nuances that the CDP doesn't. This is particularly noticable with vocals and other small details. I also like the 'effortless' sound of the DacKit which results in a very 'musical' presentation. The difference between the two is still not 'night and day' but considering the time, effort and cost involved for the DacKit, I would say it is definitely a worthwhile investment. For those with a less capable CDP, it is probably a much more significant upgrade! In my case, the DacKit is staying in my system!
|
| Site menu
Page menu
|
|
|
