|
Decibel Dungeon
|
|
|
|
When we describe the hi-fi system as a 'chain' we shouldn't really describe the loudspeakers as the last item in that chain. That title falls to the listening room (or is it the ears, brain....?).
|
|
The listening room is really an extension of your loudspeaker system. It is one of the factors accounting for the differing performances from the same 'speaker. If you want to discover how much the room affects your 'speakers, just set them up in your garden and hear how different they sound. So by altering the listening room, we can adjust the sound of our hi-fi system.
|
|
So how can we change our listening rooms? Well ,you'll be glad to hear that you don't have to move house although, you may benefit from choosing another room in your home as your listening room.
|
|
Here is a list of features for an ideal listening room:
- It should not be too small but nor should it be too large for the 'speakers which you are using. Smaller 'speakers will have a hard time filling a very large area with useful amounts of bass.
- It should have the right proportions. The worst shape is where all the room dimensions, height, width and length are the same. In that situation the sound waves all bounce off the room boundaries and meet in the centre of the room at the same time (because they have travelled the same distance). This causes an uneven sound resulting in some frequencies (particularly bass) being favoured. This is one of the causes of a boomy bass. Ideally, it should have no parallel surfaces but you will be lucky if you have such a room in your home!
- It should allow you to place the 'speakers in the optimal position with regard to the room boundaries and your listening position. This optimal position depends on the 'speakers and although there is some theory to get you started, it is best found by trial and error.
- It should be furnished in such a way that it does not overly affect any particular frequency range. Carpets and soft furnishings will help reduce bass boom and echo but too much will cause the mid-band and treble to disappear.
- The walls will be solid rather than the partition (hollow) types.
- The walls will ideally have features (pictures, moulded wallpaper, ornaments) which help break up standing waves.
- The room will not contain any items which will rattle or resonate in sympathy with the music causing unwanted sounds.
- It will be comfortable. Sounds obvious but some people pay so much attention to the hi-fi, they forget that listening to the music is meant to be pleasurable.
|
|
Even if your room is not the best shape or size, and you can't move to another room (or home), there is still quite a bit you can do to get the best sound from your system. The following suggestions are made on the assumption that you have a free hand to do what you want in the listening room. Although I live on my own, I am aware that others have to make compromises to avoid conflicts with their cohabitors.
- Look at the layout of the room. Can you re-arrange the furniture? Is your hi-fi in the best position or is it made to fit in with everything else? If you can, try different arrangements until you find the best sounding one.
- Look at the amount and type of soft furnishings in the room. Try adding or removing them to see what effect it has on the sound. If your flooring has hard surfaces try placing a soft mat between you and the 'speakers.
- When your hi-fi is playing, move slowly around the room and see if you can hear any noises coming from windows, mirrors, ornaments or anything else which can resonate or rattle. This exercise is ideally done with a source containing test tones of varying frequencies. Once you have located any unwanted noises, see what you can do to stop them. Solutions include:
- Remove the offending item from the listening room (or try it in another part of the room.
- Damp the item. Try putting sand in ornaments with cavities or something compliant between ornaments and the (hard) surface which they stand on.
- Fix loose windows and doors.
- Don't forget to look at the walls when you are optimizing your listening room. Large pictures with glass and mirrors can cause problems by reflecting higher frequencies. Large areas of plain wall are best broken up with anything which will do the job and not look unsightly. This particularly applies to areas of the wall above the height of your ears while you are in your usual listening position.
- Look at your listening position. It should be on the opposite side of the room to the 'speakers and centred between them. Allow at least half a metre between your head and the wall behind you. Remember that a well-upholstered arm chair will soak up some of the sound (more so if it has a high back).
|
|
If you need to convince someone that a good hi-fi needn't be intrusive, click HERE .
|
|
Stephen Robinson has some further suggestions for improving room acoustics (and supporting equipment) on his very interesting Izzy-Wizzy site.
|
| Site menu
Page menu
|
|
|
|
|
I have found from experience that one of the biggest improvements you can make to the sound of your h-fi is to get the 'speakers positioned correctly. It is well worth the time and effort to get this right, but, if you have large, heavy 'speakers, it could mean a lot of effort!
|
|
Below is a diagram of an imaginary listening room showing the correct positions for the 'speakers and listener.
|
|
|
D1 = distance between 'speakers
D2 = distance from line joining 'speakers to listening position
D3 = distance from listening position to wall behind
|
|
The 'speakers should be placed a minimum or 1.5 metres apart (D1) and depending on their size and type (sealed box, ported, horns etc) should have a certain amount of space between them and the rear and side walls. The distance from an imaginary line joining the two 'speakers to the listening position (D2) should not be less than the distance (D1) between the 'speakers.
|
|
Unless the 'speaker has been designed to go right into a corner, it will cause problems if placed in one.
|
|
Most (but not all) 'speakers benefit from being 'toed in'. This is where they are placed at an angle so that they face in toward the listening position. The amount of toe-in is critical and can only be found by trial and error. A good starting point is to have the 'speakers angled in so that imaginary lines coming from the front of the cabinets would cross each other just in front of the listening position.
|
|
 - After going around in circles, trying to find the correct position for my 'speakers, I decided to take a more methodical approach. The problem was that I didn't have an accurate way of recording the exact positions I had tried previously. To overcome this, I constructed a useful tool. - After going around in circles, trying to find the correct position for my 'speakers, I decided to take a more methodical approach. The problem was that I didn't have an accurate way of recording the exact positions I had tried previously. To overcome this, I constructed a useful tool.
The tool is made from two strips of timber, each about a metre long. These are bolted together at one end so that they make a sort of protractor. Use a wing-nut to enable you to loosen and tighten the bolt by hand. A scale is marked on both sides of both strips, and these, together with a reference point marked on the rear wall, enable me to record the precise position of the 'speakers. Not only can I work out the distances from the side and rear walls, but I also have a record of the 'toe-in' angle. As a bonus, the protractor makes it easy to position both 'speakers symmetrically.
|
|
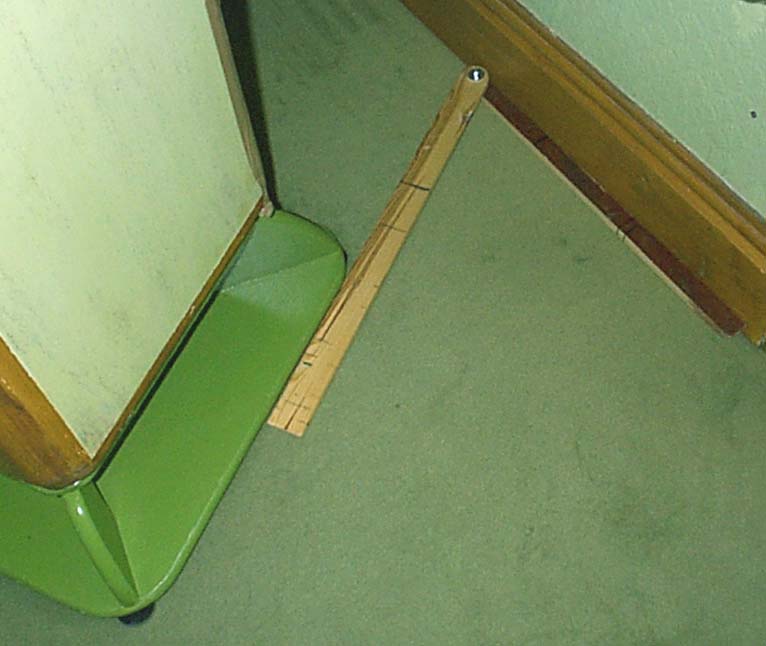
Using the 'protractor' to position a 'speaker
|
|
There are two other considerations when positioning the 'speakers. The first is to get the height correct. The tweeter should be level with your ears (when you are in the usual listening position). I have also found that the vertical angle of the 'speaker affects the sound so it is a good idea to have some method of altering it. If you have adjustable spikes on your 'speaker stands or cabinets, you may find that this provides enough adjustment. If not then you could try getting some longer spikes, or using some wedges to provide greater adjustment.
|
|
Remember to leave a minimum of half a metre between your head and the wall surface behind you (D3).
|
|
Trying to get a pair of 'speakers positioned correctly, with the correct 'toe-in' angles, vertically aligned at the right height may seem like trying to find a needle in a haystack. However, if you build yourself a 'protractor' and take your time, perhaps limiting your trials to one movement each day, you will eventually find the best arrangement and find that it makes a worthwhile improvement to the sound quality of your hi-fi.
|
|
- You will find it much easier to establish the optimum set-up for your hi-fi system if you use a test record or CD. These contain tracks which are designed to help you get the best from your hi-fi. I use the Hi-Fi News and Record Review (HFNRR) test CD which you can read about HERE.
|
|
Finally on this subject, a few words about 'bookshelf' 'speakers. These are the very small 'speakers which we are told are designed to go on a bookshelf. No doubt some of them will work reasonably well on a shelf and many are designed so that their placement up against a wall will help their (bass) performance. However, placing a 'speaker on a shelf, or on the wall using a wall bracket, obviously limits the possibilities for experimentation.
|
SOUND STAGE - When you listen to a good hi-fi, you should be able to perceive a three dimensional area around your 'speakers which we call a sound stage. This should extend well outside the actual 'speakers, both in width and depth. To get depth, the 'speakers need to be positioned well forward of the wall behind them.
IMAGING - an audio 'picture' of a sound source, eg a singer or instrument. In a good system you will be able to clearly perceive where this is situated within the sound stage.
|
|
With a few notable exceptions like the famous BBC LS3 monitors, 'bookshelf' type 'speakers are not considered audiophile quality and are probably best avoided unless you are very limited for space. It's not that small 'speakers cannot perform well, they can if used with a sub-woofer, but confining them to a position against a wall is likely to limit their performance as regards certain qualities like the depth of sound stage and imaging.
|
| Site menu
Page menu
|
|
|
|
|
Although less critical as regards the sound quality of your system, having the rest of your hi-fi located properly is also important.
|
|
In theory, you could place your source component(s) and amplification almost anywhere in the room and, providing you have long enough cables to connect them to your 'speakers, the hi-fi will work. In practice things are a bit more complicated.
|
|
In the section on hi-fi cables, we looked at how different cables can affect the sound of our hi-fi systems. It makes sense that the longer the cable, the more it will affect the sound so it is best to try and keep all cable lengths as short as is practically possible. Even the sceptics who disagree about the affect different cables can have on sound quality, agree that shorter is better. For that reason, the optimal position for hi-fi equipment is between the two 'speakers. In theory, if you have placed your 'speakers two metres apart, then the 'speaker cables from the amplifier need be little more than a metre long. Of course, for aesthetic and safety reasons, it is not practical to run cables in a straight line from amplifier to 'speaker so we must also consider the extra length needed to route them sensibly.
|
|
Now if the length of cables was our only consideration, we would be 'home and dry', but unfortunately we also have to think about another hi-fi problem, that of ensuring that the equipment is not affected by unwanted vibrations. These can be transmitted through the air from the 'speaker cones or through the floor, and, to a lesser extent, the walls. Obviously , the closer your equipment is to a 'speaker, the more susceptible it is to these vibrations.
|
|
We could 'retreat' to the opposite end of the room but then we are back to the long 'speaker cables. Should we compromise and have the equipment half-way across the room? Or could we use wall-mounted equipment racks which would minimise the amount of vibration coming from the 'speakers through the floor (but not through the air)? I can only describe my set-up which seems to work quite well (after much experimentation) and should give you some guidelines to setting up your own system.
|
|
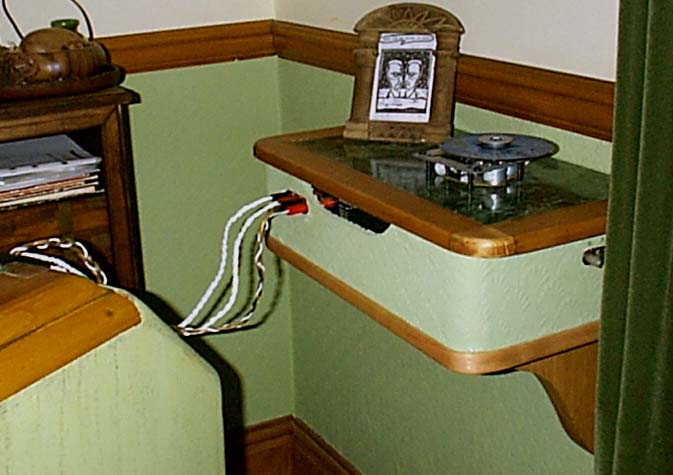
I prefer the 'shortest cable' option and have spent my time trying to minimise the vibrational effects from the 'speakers. My equipment is sighted between the 'speakers in a bay window, on low stands. The power amplifiers are housed in wall-mounted boxes, immediately behind each 'speaker. My turntable is mounted above one of the amplifiers.
|
|
My listening room has a suspended wooden floor and I have made the following modifications to minimise the problems caused by vibration:
|
|
I have found that despite being situated immediately behind a 'speaker, the turntable does not seem to be adversely affected. This may be due to the design of my turntable where I have gone to some length to combat the problems of vibration. As it is the only practical location, I don't have much choice as regards repositioning it. (You often find that you have to make some compromises with hi-fi)
|
|
I firmly believe that wall-mounting is preferable to floor-mounting for hi-fi equipment from the sound quality point of view. Of course, there are reasons against it:
- It may be unsightly
- You may not want to drill holes in your wall
- There may not be the space
|
|
|
The first objection can be partially overcome with some careful design. In the case of my power amplifiers you can see that they are not visible, the cabling hardly shows, and the 'box' is a not unattractive shelving unit.
|
| Site menu
Page menu
|
|
|
|
|
So, assuming that you have now decided where to position your equipment, what is the best way of supporting it?
|
|
As with cables, there has been much argument about the best way of supporting the electronic equipment used for hi-fi. And, of course, there have been many wild and wonderful theories, mostly emanating from those who were trying to sell their 'ultimate' equipment supports.
|
|
One of the fundamental questions is whether the equipment should be coupled or decoupled to the support and/or floor/wall. Some favour decoupling and go to great lengths to achieve it, even hanging their equipment on bungies from the ceiling!
|
|
And then there is the question of whether spikes couple or decouple. I've asked this question of several 'experts' and have never received a satisfactory answer. What does it matter? Well, we have two main considerations with equipment supports. One is trying to prevent external vibrations from getting into the equipment. This is very important with source components like turntables and CD players, less so with amplifiers and tuners etc. At the same time, we also want to have some method of draining away the vibrations produced by the equipment itself.
|
|
The problem is, if we manage to completely isolate a piece of equipment from external vibrations we have then effectively cut off the path by which we can drain away the internally produced vibration. I wish that I could now write a concise and easy to understand essay on how energy travels through mass and how to control vibration. However, I have searched the internet for an easily understandable explanation but have yet to meet with any success. So, as usual, it's down to experimentation and what I have learned with my own system.
|
|
One thing I have found is that just throwing loads of mass at the problem and hoping that this will 'sink' the unwanted energy, has its drawbacks. It would work if the energy entered the mass never to re-emerge (or at least not until we have finished listening). However, the energy is only temporarily stored by the mass, and then released causing a muddling of the sound due to the delay caused by the time it takes the energy to pass through the mass. Remember the scientific law that energy cannot be destroyed, only changed!
|
|
|
|
In my experience, the effect of using a large mass ( under a source component) manifests itself in poorer timing, making the music appear slower. I have encountered this effect on several occasions with 'speaker cabinets, 'speaker supports, equipment racks and even the supporting shelves under equipment so I am fairly confident that this is not the way to go.
|
|
Equipment supports obviously need to hold equipment securely so my recipe for racks and supports is 'light and rigid'. I prefer to use wood to metal as:
- It doesn't 'ring' like metal so doesn't need damping.
- It is easier to work with.
- It tends to look more acceptable in a domestic setting.
|
|
I haven't had the time or money to experiment with different types of wood, often using what is available at the lowest cost. A friend who works with wood recommended I try some tulip wood, a cross between soft and hardwood with a straight grain. This is what my equipment racks are now built of.
|
|
The racks are spiked to the floor using home-made spikes. These I make from threaded rod which I grind to a point at one end. The other end is inserted into a T-nut; a plastic disk, bolted to the spike acts as a thumb-wheel and facilitates adjustment. I know that hardened steel is deemed better for this purpose but it would make construction much more difficult without the right tools to fashion it.
|
|
Home made spikes
|
|
Each piece of equipment sits on its own support which in turn sits on the 'arms' of the rack. I use standard wood screws to 'spike' the supports onto the 'arms'. This also allows for accurate levelling of the support using a screwdriver.
|
|
So we know where to place the hi-fi equipment, we have decided on the type of rack to place it on but we're not quite finished yet. There are two more stages before we have finished this job.
|
|
The first is to decide what exactly the equipment will sit on. And does it matter? I once carried out an experiment to find out and I was quite surprised at the outcome.
|
|
At the time, I was using a wall rack for all my equipment, I decided to try placing different sheets of material underneath the CD player. I had to hand some MDF, block-board, 6mm glass, 3mm aluminium and 20mm marble. To my surprise, I was able to distinguish differences in the sound when I changed one type of material for another. The glass sounded brighter, the marble duller. There was little to choose between the other three but I eventually decided that the best solution was the block-board (which is lighter than the MDF).
Update 2007. I now have no doubt that granite is the best material to have under a piece of hi-fi! But much depends on how the equipment is coupled to the granite, and how the granite is decoupled from the stand.
|
|
I've have been using block-board since that experiment. Occasionally I have been tempted to try the marble again (mainly for cosmetic reasons) but have always gone back to the block-board. It's not a question of better or worse, more what works well with your own equipment but I repeat, I don't think that high mass has a place in a support system, particularly to support CD players or turntables.
|
|
So, we're nearly there. Just place the equipment on the support and that's it. Well, not quite that straight forward because there's one last option to be dealt with.
|
|
The last choice is: what do we place between the equipment and the support platform? And these are the options:
- The feet which come as standard with that piece of equipment
- Metal spikes
- Cones, either metal, ceramic, carbon-fibre, wood, plastic
- Compliant feet made from rubber, sorbethane or some other 'squidgey' material
- A partially inflated inner tube
|
|
Once again, I have spent probably more hours than I should have on trying out just about every option. I've tried four 'feet' and three, inflated inner tubes, and other different compliant materials. My preferences were for the non-compliant types of feet, particularly the cone types.
|
|
I am currently using an arrangement based on an idea given to me by a friend. It is the basis of a forthcoming commercial product and I have agreed not to divulge the exact details. All I can say at present is that experimenting with how you support an item of hi-fi on its platform can pay huge dividends!
|
|
I haven't been tempted to play with any part of my support system for quite a while now, a sure sign that it is working well. I hope that the above information may save others at least some of the time I have spent experimenting on this part of my hi-fi.
|
|
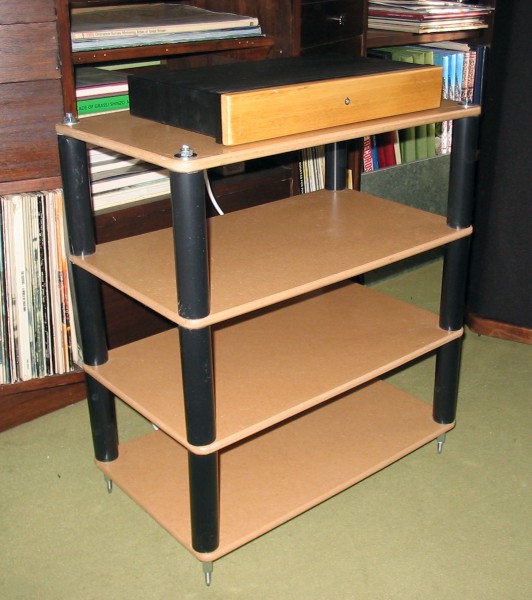
Update, 2007. My system is now much changed and I have recently built a version of the TNT Flexy Table from threaded rod, plastic pipe, and MDF.
|
|
- If you really must have marble, or better still, granite to put under your hi-fi, go to somebody who produces fire-surrounds. They often have a stack of marble slabs which they cut from surrounds (the bit where the fire goes). In my experience they are glad to get rid of these 'off-cuts' for what ever they can get for them. I paid just £5 for pieces 430mm by 300mm including a polished front edge!
|
|
|
|
|
|
It's been far too long since I wrote anything new of consequence on Decibel Dungeon, so here is an important new article on equipment platforms and how to mount the equipment to them. This subject is one of the most hotly debated issues in hi-fi and you will find a lot of conflicting (and confusing) advice. In fact, what I am about to write conflicts with a statement that I made earlier on this page - that is how confusing the subject can be! However, I hope that the following is clear. Make no mistake, following this advice should make a real improvement to how your system sounds.
|
|
Microphonics is something that audiophiles have been aware of for a long time now. It is particularly associated with valves but applies to just about any circuit or component where electricity passes through it. Microphonics is basically vibration caused by the electrical power passing through the component. Of course, that isn't the only vibration that the audiophile has to contend with. There is external vibration caused by the loudspeakers, traffic passing near to your home, and probably other sources.
|
|
I believe that it is because there are the two categories of vibration, ie internal microphonics, and external sources, that many audiophiles get completely lost and confused when trying to mount their equipment properly. For instance, it may seem logical to place each component on something like a rubber inner tube to 'cut off' or isolate the external vibration coming from the floor to the equipment, but then how do you get the microphionic vibration out of the equipment when you have cut off the 'path' with the inner tube? And what about all the options for just mounting something like a CD player? There are soft feet (rubber, cork, Sorbethane, springs), spikes, wooden cones, combinations of materials, stones, the list just goes on and on.
|
|
Of course part of the fun of this hobby is to try it all and see what works best, but in the end, you could just land up going around in circles. So here is something that works, and works very well. It is based on sound scientific and engineering principles, and I am greatly indebted to the people who generously helped me develop what I am about to describe.
|
|
Well what do we do to remove the potentially damaging vibrations from inside the equipment while also isolating the equipment from the external vibrations coming from the floor up through the equipment rack? First we need to understand a little about what is actually happening, and how vibration travels around. Vibration travels around, it doesn't stay in one place unless there is no path for it to travel along. So we need paths for it to move along (out of and away from our equipment). It may seem obvious but that is one of the reasons that we have feet on equipment, they provide paths for the internal vibration to travel out of the equipment (and you thought they were just for the case to sit on). So we want a path (or paths) to take the vibration out of our equipment but conversely, we don't want a path that will permit external vibration to travel in to our equipment via the rack/shelf. Initially it seems as though we have a problem that can't be solved, but there is always a solution. The solution in this case is akin to an air lock in a submarine, one of those devices that allows a person to leave the submarine under water, without letting the water inside, and flooding the submarine at the same time. Our air lock will be a reservoir of mass! But let's start by looking at different methods of mounting hi-fi equipment, and what is actually happening.
|
|
|
|
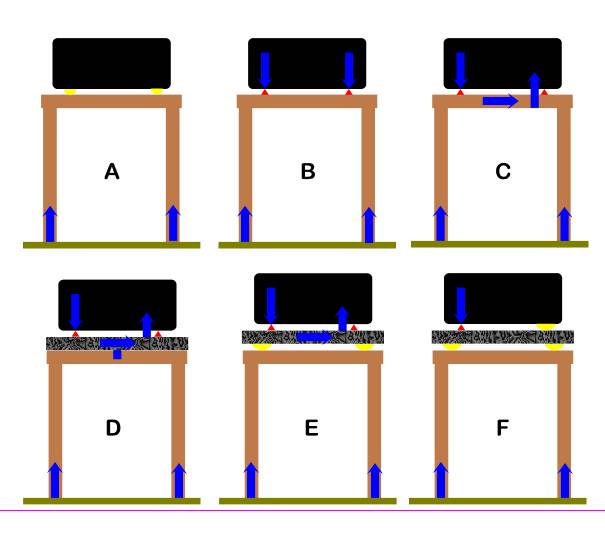
The above diagrams show the various options for mounting a piece of hi-fi equipment. In diagram A, the equipment, a CDP for example, is sitting on the shelf of the equipment rack, and has four soft (eg rubber) feet (yellow=soft). Rubber is not a good conductor of vibration (mechanical energy) because it is not a very hard and compact material. So the vibrational energy (for want of a better description) inside the CDP has nowhere to escape along and therefore stays inside the CDP. The external vibrational energy can travel up the rack and into the shelf but the rubber feet will isolate it from the CDP.
Diagram B shows the same arrangement but with the CDP with four hard feet (I've shown upturned metal cones but it could be any hard material)(red=hard). Now the vibrational energy in the CDP has a path (or actually paths) to move from inside the CDP to the equipment platform. But now the external vibrational energy can travel up the rack and into the shelf and into the CDP through the hard feet.
Actually, things are even worse than they seem. Because when you have more than a single path for the internal vibrational energy to flow through, it will travel through what ever is underneath the equipment and find its way back into the equipment through one of the other paths (feet).
In diagram D, I have added a slab of granite underneath the CDP. Now this will absorb a lot of the vibrational energy but with four hard feet, the path is still there to allow the energy back into the CDP. The external vibrational energy can still also travel through the granite and into the CDP.
So in diagram E, the granite slab is decoupled from the equipment rack by placing some soft feet between them. Things are starting to get better but we still have that loop between the CDP and the granite slab.
To break the loop, we use a single hard foot under the CDP, and to keep the CDP from falling over, we use soft feet in place of the other feet. I actually prefer to use three feet, one hard and two soft but I suspect three soft will work as well. The loop is now broken so the internal vibrational energy will flow out of the CDP and into the granite block but not back again. But why is that?
We could think of the single hard foot as the equivalent of a diode. A diode allows current to pass through it, but only in one direction! The single hard foot is doing a similar job. How well it will do that job depends on it's shape and the material that it is made from, and you can buy some extremely high-tech feet that act almost 100% like a one-way path. Unfortunately, those feet are very expensive due to the complexity of manufacturing them. The good news is that we can go a long way in producing our own diode feet for a small cost in materials, and a little bit of our time and effort.
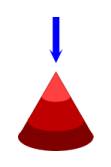 Another principle that we must grasp about how vibrational energy behaves is that it will be attracted from an area of low density mass to one of high density (rather like electricity is always attracted to an 'area' of lower potential). This could mean a larger area of mass, or one that is denser but may be more compact. And it travels more efficiently along paths of high density than low density material. Hence a metal spike will be better than rubber feet for 'wicking' vibrational energy out of our equipment. This also gives us a starting point in designing a 'better' foot. Think of a cone like the one shown to the left. If you think of the cone as three stages, with each lower stage having a higher mass than the one above, the vibrational energy will be drawn through the tip of the cone to the second and third layers, and then into whatever is coupled to the base of the cone (providing that has higher mass than the cone.
What ever the foot is, it does need to do one job well, and that is gripping the equipment and the platform. In the case of the cone, if we make the tip very sharp (and hard) it will grip the case well by 'biting' into it. The base is a bit more difficult and ideally we could do with the base having hard spikes as well. But unless we have access to specialist machining facilities, we will have to find another way to create our foot that grips at both the top and the bottom. This grip is important because it prevents the lateral movement of the foot (and/or case) that would make it much less efficient at conducting the vibrational energy out of the equipment and into the platform.
 The device shown to the left is made from five parts. Four of those are simple wood-screws, and the other is a metal disc. I used the metal shims that are used to set the tappet clearances in Volvo 240 cars but you can use anything metallic of a similar shape and size. The diameter isn't at all crucial but I suggest keeping the screw lengths to around 12mm (half an inch) unless you want your equipment to sit very high off the platform. To make the tripod (as I call it), glue one screw to the centre of one side of the disc. Glue the other three, equally spaced, around the other side of the disc. If you can, harden the screws by heating them up in a flame and then plunging them into cold water. But be very careful doing that and always use some heavy duty pliers to hold the screw while it is heating up. I use Superglue to glue the screws to the disk and a two-part epoxy resin (Araldite in the UK) will work too. You can also add mass and weight to the tripod with a hard-setting epoxy putty like Milliput. That will make the tripods slightly more stable, and probably improves their performance too. Here is one I made earlier!
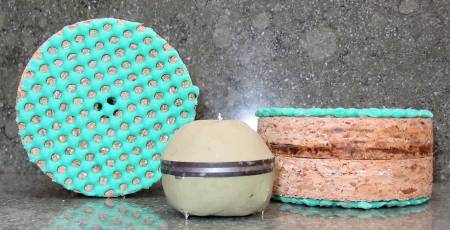
Remember, we only use one of these feet under each piece of equipment! So when you have made your Decibel Dungeon tripod, make up a pair of feet that won't couple the case to the platform. One of the easiest to make up uses a smallish piece of timber with small pieces of rubber glued to the top and bottom. The rubber will help grip the equipment and the platform, further reducing the tendency of the case to move laterally. I've made many different sizes of the 'soft' feet and the larger their surface, the better they grip. A couple of the larger ones are shown in the picture above. The rubber is actually that non-slip matting that you can buy for car dashboards etc.
|
|
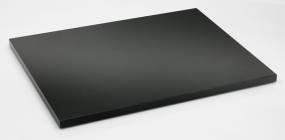
Having made up a set of feet we now turn our attention to the platform. You have probably seen a variety of materials touted as the 'best' for a platform but for use with the tripod feet we only really want to look at granite. You can buy granite almost anywhere. In fact many supermarkets sell granite chopping boards that are about the correct size for an equipment platform. Ideally the granite should be unpolished as we want to increase the grip of all three feet. If you buy a chopping board and it is polished, simply turn it over and use the unfinished side. The only other thing that you need for your platform is a means of decoupling it from the equipment rack shelf. You could use thick carpet, squishy balls, or whatever you fancy. I use Foculpods that are made from Sorbethane and with one in either corner, they work well. If you want to get really obsessive about this, you could add a second layer of granite over the first one, but separated by a number of small spikes, cones or crews. Anything that will allow the vibrational energy to flow from the top piece of granite to the lower one.
|
Why granite? Granite has a very random grain structure and is very hard. This means that is conducts the vibrational energy very well and sends it on a long 'journey' around its labyrinth type path (caused by its random grain structure). You can't destroy energy but you can send it where you want it, rather than where you don't want it. Other denser materials may encourage the energy to flow into them but the path that the energy takes will be much shorter and the vibrational energy will then be reflected back, effectively causing a 'traffic jam' where the tripod rests on the platform.
Marble is not the same as granite and should not be substituted in this case.
|
|
So now the external vibrational energy coming up the rack is effectively halted by the barrier formed by the soft feet under the granite. The internal vibrational energy has a path to flow out of the case and into the granite slab (but no paths to flow back to the case again). And believe me it works and depending on the equipment being used, makes a substantial improvement to the sound quality. Don't believe me? Well that's your prerogative of course but with granite slabs costing around ten pounds in the UK, and the cost of the tripod feet just a few pence, you would have to be very sceptical not to at least try it for yourself!
The downside of this method of mounting equipment is that it is a little more unstable so you will have to be careful with attaching cables, particularly the heavier variety. Also experiment where you put the feet. They should be placed in a triangle but moving the coupling foot (tripod) around can and does make a difference. In practice the instability shouldn't be a big issue and any inconvenience is out-weighed by the sonic improvement. Another benefit of this system is that it negates the effect of the equipment rack so you don't need an ultra-expensive rack to get the best results. Happy tinkering!
|
| Site menu
Page menu
|
|
|