Hung up on DIY hi-fi?
Then welcome to

Building three-way active speakers powered by chip amps.
A design by Christof Heinzerling.
![]()
![]()
Decibel Dungeon
Introduction.
This article is a bit of a break with my policy of only writing about hi-fi that I have actually built myself! But since I added the Gainclone section to Decibel Dungeon, and hung around the chip amp forums, I have seen more than a few suggestions for using the chip amps to power active speakers.
- Smaller value components for the crossovers. This give a lot more flexibilty in the crososver design making steeper crossovers and response correction much more achievable.
- Direct coupling of the amplifier to the driver. This makes for better control of the driver by the amplifier. It also means that less power is needed to get the same sound levels as there are no crossover components to 'soak up' the signal before it gets to the driver.
- Better dynamics due to the above.
Introduction
I have enjoyed numerous live concerts, but I have yet to hear a sound system that could faithfully reproduce live sound in my living room. So I decided to build the ultimate loudspeaker system.I investigated many technical papers before embarking on the design. There seems to be a lot of detail on bass reproduction, but there is little information on closed-box all round concepts of the type that could suit my needs. But, after a lot of searching, trial and error, I believe I have found the solution.
Design goals
My wife appreciates good sound quality, but prefers it to come from an enclosure that is ideally invisible. Despite the enclosure size restriction, I decided that the bass should extend down to 20Hz, and that it should be possible to build an enclosure within a book shelf.My solution had to be affordable and easy to build. This meant using electronic modules that required little setting up, but nevertheless did not compromise the sound reproduction.
John Linsley-Hood found that 2-3W output is a sufficient sound level for normal listening requirements.' I believe that there is no need for very high-powered amplifiers in a domestic environment. If you have heard a live rendering of Mussorgsky's "The Great Gate of Kiev', you will understand that it is impracticable to reproduce such crescendos involved in your living room.
Although the sound system described here is designed for quality rather than quantity, it can still produce high-quality loud music in a domestic environment.
The Concept
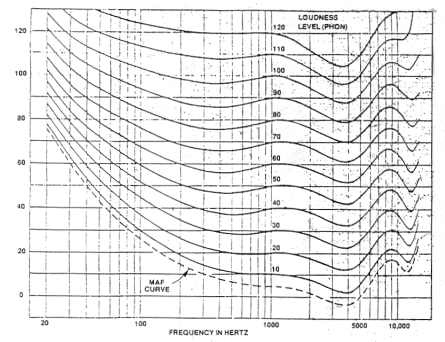
Fig 1.
Ref. Ben Duncan, 'The Spirit of Bass' Electronics World Feb. 1994.
If the bass unit's response is to be lowered from 40 Hz to 20 Hz, a sound-pressure increase of nearly 20 db is necessary to achieve the same perceived level, as these loudness contours show.
A large bass membrane area is indicated by these figures. To keep the enclosure small, it is possible to mount the woofer in the side of the cabinet, but this degrades the stereo image, so multiple smaller speakers are a good compromise.
In spite of the very low 20Hz requirement, I chose closed box, as suggested once in Speakers' Comer.
Ref. John Watkinson, 'Loudspeaker Exposed' Elerctrinics World, June 1997.
As the sound pressure rolls off at exactly 12dB/octave it is possible to compensate for the roll-off with well known filter circuits.
Ref. R A Greiner, and Michael Schoessow, 'Electronic Equalisation of Closed Box Loudspeakers', J A E S, Vol 3, Mar. 1993.
Ref. Jeff Macauley, 'Big bass, small box', Electronics World, Feb 1994.
So a blameless physical - and also mathematical solution - can be arrived at, resulting in clear bass reproduction.
Using two bass speakers in a front - rear arrangement results in excellent clarity. The action of the front speaker is compensated by the reaction of the rear speaker. Even with high sound pressures, there is no movement of the loudspeaker cabinet and therefore there is no unwanted cabinet radiation.
My next task was to find a suitable amplifier.
Ben Duncan, 'Spectrally challenged: The top ten audio power chips'. Electronics World, Oct. 1993.
Ben Duncan explains that the TDA1514A from Philips Semiconductors is an overlooked jewel. The chip costs around 2 UKP. Surrounding it with the necessary passive components mounted on a stripline board together with an aluminium angle heat sink results in an inexpensive high-quality 40W amplifier for about 5 UKP. Every speaker has its own power amplifier, receiving full power from an impedance of practically O ohms.
Ed's note - I have left this part of the article in although the 1514A chip is no longer produced.
The LM3875/LM3886 chips are excellent replacements and it is easy to find circuit diagrams for them, either on this site or one of the main chip amps sites in the Gainclone Ring.
To separate the frequency domains, I used a well-proven yet simple filter.
Jan Gosling, 'Extending Bass', Electronics World, Feb. 1994.
Letters, 'Too simple to be useful?', Electronics World, Aug. 1999.
Because of its transfer character, I like to call it a 'correct-step difference filter'.
Since the power amplifier I chose is so easy to implement, I decided to design a three-way speaker arrangement. Each speaker handles a narrow sound band, in spite of the fact that the slope of the filter difference output is only -AlB/oct. Since the sound level of each frequency domain is variable, it is easy to adapt the system to the room acoustics.
To prevent diffraction in the middle and high-frequency sections, I chose spherical enclosures.
John Watkinson, 'Speakers' Corner', Electronics World, May 1998.
This results in a stereo image of such clarity and width that I can say that, together with the extended bass reproduction, this is the sound of my dreams.
As all elements of the system are easy to calculate, this speaker concept is adaptable to different speaker chassis and room criteria.
The electronics
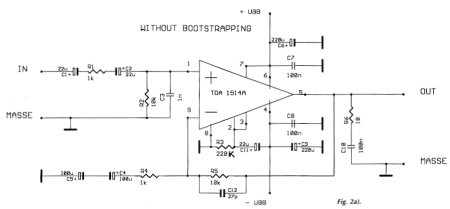
Fig. 2a
One complete power amplifier using the TDA1514A is shown in Fig. 2a). Input components C1,2 and R1,2 form a high-pass filter with a comer frequency of 1.3Hz, a voltage division of 10/11 and a low pass of greater than 100kHz.
The non-inverting operation yields amplification of 11, nearly the lower allowable value proposed by Philips. Together with the divider the resultant ~ voltage gain is exactly 10 at 1kHz.
The lower comer within the feedback circuit is formed by R4, C4 and C5 and yields a frequency of 3.2Hz.
Ben Duncan, 'Proof for the golden ears hypothesis?' Electronics World, Jun. 1992.
Components C11 and R3 are proposed by the manufacturer and set the muting time.
Essential for stability is the R6, C10 combination across the output pins and the direct mounting of the 220uF capacitors C6 and C9 on the stripline board. Bootstrapping between pins 5 and 7 (220uF-150ohms-82ohms) enhances the output power by about 10%, but it was omitted to keep costs down.
Figure 2b shows the mechanical construction with a O.l in-pitch stripline board. It is mounted on an aluminium angle bracket to facilitate testing and assembling. The assembly needs to be mounted on a main heatsink with a thermal resistance of about 1.5KAV measuring 25cm x 10cm x 2cm. Note that the metal area of the chip back-side connects to the negative supply voltage -UBB.
As the negative supply voltage is only 26V, it is not strictly necessary to isolate the chip from the sink. It is safer though to isolate the chip and to earth the main heat sink.
An essential part of this design is the 'correct-step difference filter'. As the music signals are extensively characterised by transients, I found that this filter is a good choice. An input step is exactly reproduced as an output step when the two output signals are summed.
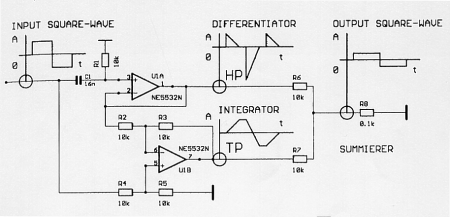
Fig. 3.
Principle of the applied crossover-filter in it's simplest form. It shows that an input square-wave is exactly reproduced as an output square-wave. Input steps will not be distorted, resulting in a 'correct step difference filter'.
In Fig. 3 you can see that the input squarewave feeds an upper high-pass channel C1, R1 and a differentiated signal appears at its output, point HP. In the difference amplifier around U1B this signal is subtracted from the original input signal, resulting in the wave form of an integrated signal at point TP. Summing these two outputs at R8 reconstitutes the original square-wave form, but with reduced amplitude due to the voltage divider.
Filter details
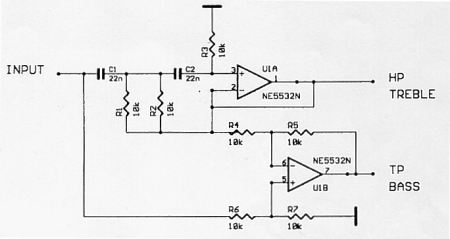
Simple high-pass filter is replaced by a second-order Butterworth high-pass filter (R1/R2=1/2R3) with a corner frequency around 1 Khz.
Figure 4a) shows a second-order Butterworth filter in the high-pass section. It has a comer frequency of 1kHz. The values shown result in an amplitude of -3dB, a phase of +90° and an ascending slope of 12dB/octave at the HP output. All this is well known. If you subtract this HP signal from the input signal you get the frequency responses in Fig. 4b).
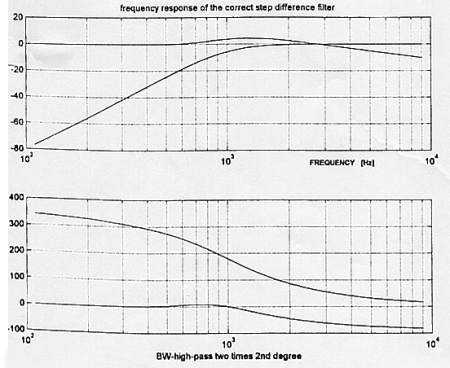
Amplitude and phase response of the high-pass section are standard. The response of the low-pass channel is for illustration purposes only. Response roll-off is poor, at only 6db/oct independent of the order and character of the used filter.
The high-pass section is conventional. The low-pass section is only for illustration purposes. From it, you can ascertain that there is a slope of only -odB/oct. This slope is independent of the degree and character of the highpass filter. Its amplitude is about +1.9dB and it has a phase angle of -34° at the comer frequency of 1kHz.
The slope of only -6dB/octave is a disadvantage and seems to call for a speaker chassis with an extended frequency range. But if you look at the double comer frequency of 2kHz you will see that the high-pass stage has reached its final amplitude and a phase of 43° is measured. The difference channel is now unnecessary. There seems to be no need for an extended frequency behaviour of the bass unit above double the comer frequency.
In the time domain, the properties of the filter are excellent. A Butterworth filter shows overshoot, which results in undesirable distortions in transient musical events.
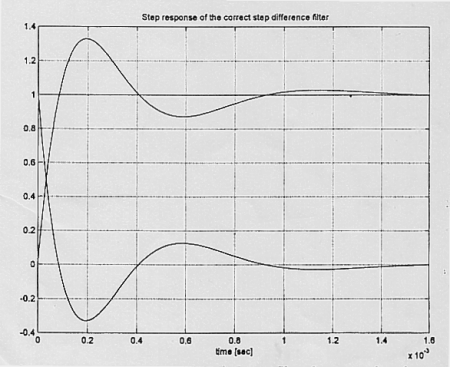
Fig. 4c
The step response of the high-pass filter shows overshoot but the difference channel equalises it. That means that the overshoot of a Butterworth filter adds no distortion in the time domain.
But if you look at the step response of filter Fig. 4c) you will see that this over swing is compensated in the difference output, making it insignificant. In other words transient events will be exactly reproduced independent of the applied filter characteristic, resulting in clear sound.
On carrying out blind tests listening to music reproduced with various filter types, the 'correct-step difference filter' came out best every time, producing a natural sound.
Control circuitry
Now I'll explain the control circuit, Fig. 5. In reference 12, Ben Duncan tested the distortion behaviour of audio op-amps and of those tested, the NE5532 came out best. But as this amplifier is compensated to provide stability at unity gain, its slew rate is only 9v/µs.
If you replace this amplifier with an OP-275, the slew rate rises to 22V/us and a clearer sound results. The voltage noise density is slightly higher, but this is of little consequence. Its price though is double that of the NE5532, at about 1 UKP.
Distortion is well below 0.001% if the maximum signal amplitude stays below 3V. In the interests of low noise and minimal errors, lOktl resistors were used throughout.
The front filter is straightforward. Determined by R2/C2, the upper corner is high enough, at over 100kHz. Op-amp U1A drives the three high-pass filters for the treble, the mid-range and bass.
The treble filter has a low comer frequency of 4kHz. Its output, at op-amp UIB, feeds the treble potentiometer whose inner resistance doesn't exceed around 600 ohms. This treble signal also connects to the inverting branch of the upper difference amplifier U2A to limit the mid-frequency domain to 4kHz.
With a corner frequency of 400Hz, the mid-range filter works in the same way. This frequency is relative high. It allows the use of small mid-range speakers with low membrane mass, while the 'woofer only has to work up to 1kHz.
The second-order high-pass in the bass branch, comprising R7,R8,C7,C8 works together with the high-pass of the input circuit C1/R1. This yields a third-order Bessel high-pass filter with 20Hz lower comer frequency at the output of op-amp U3B. At the output of op-amp U3A is the bass channel, which drives the internal bass potentiometer
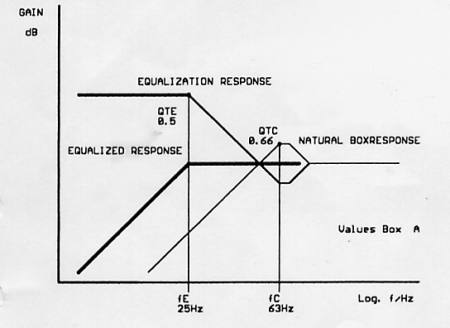
Fig. 6a
Bass equalisation. The natural box response is characterised by Fc="63 Hz and Qtc=0.66. As an equalised ressponse of fE="25 Hz and Qte=0.5 is required, it is necessary to implement the circuit in 6b to generate the equalisation response. This simple method is possible because the slope of the closed box is indeed exactly +12 db/octave.
As mentioned above, the closed-box equalisation is easy to realise. In Fig. 6a) the fine line shows the natural response of the built in speakers with Fc and QTC. Correction values Fe and QTE are chosen to produce the bold line, i.e.Equalisation is provided by the well known network shown in Fig. 6b).
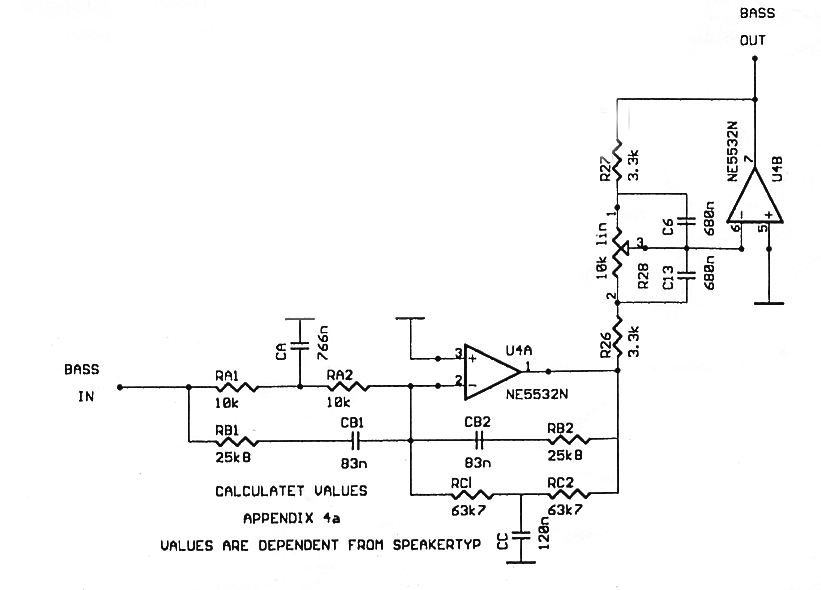
Fig. 6b
Well known bass-equalisation around U4A. Calculating the properties of Box A fives the values shown in the circuit. The bass-boost around U4B is a simple Baxendall circuit. Whewn throwing a party you can save your woofer by reducing the driving voltage with the bass-boost potentiometer.
Calculations for determining the resistor and capacitor values are presented in a separate panel. The values here are for the small box 'A'.
Finally, there follows the deep-bass booster. It is an ordinary Baxandall bass control with a range of ± 12dB and an upper corner frequency of 94Hz.
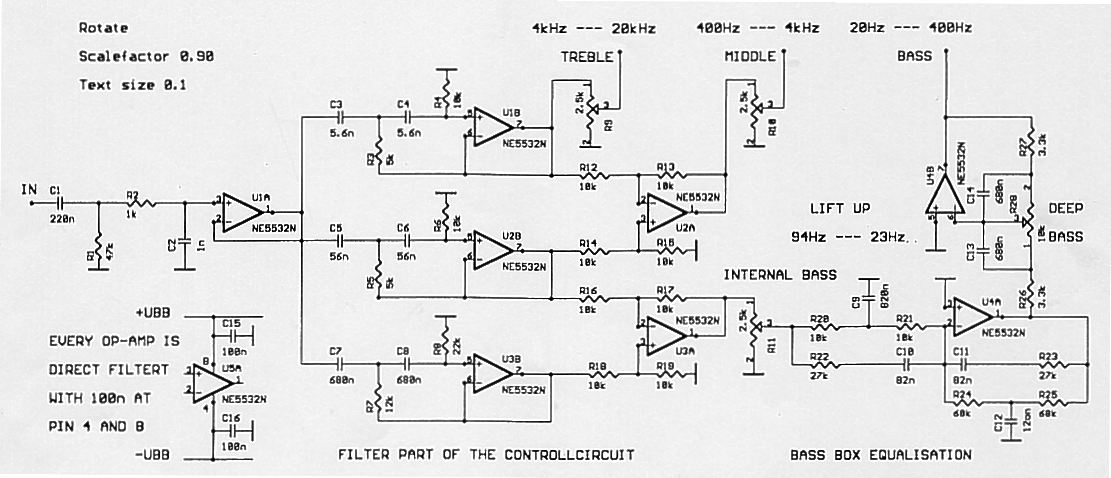
Fig. 5
This is the whole control circuit. Op-amp UA1 supplies the high passes of the three frequency bans. The upper frequency band is then subtracted from the next lower band in a difference amplifier. In this way, the corner frequencies are reproduced exactly. The allowable load is 600 ohms so linear potentiometers can be connected without buffering. These feed the inputs of the power amplifiers or, in the case of the woofer, the bass filter. The bass filter provides bass equalisation and bass-lift to compensate for attenuation in the sub-bass area. The frequency values represent a convenient distribution so adapting the sound level to room acoustics is easy. If you replace the NE5532 with an OP-275 you will have to pay double the price, but the difference is clearly audible.
A quick check of the signal voltages within Fig. 5 can be made to ensure proper working. Assuming an output power of about 40W at the bass speaker with a 40 load, an effective output voltage of 12.7V is needed, which requires 1.27V at the input of the power amplifier.
As there is bass lift. Fig. 6a, about 0.2V needs to be delivered to the internal bass potentiometer and also to the input. This is because the filter circuits here have a voltage gain of unity, which represents a good compromise between distortion and noise.
The control potentiometers are linear. As the power amplifiers have a capacitor input, no precautions are needed to suppress offset voltages at the output of the control circuit. As a result, the circuitry is simple and is safe.
Conventionally, the power supply is built with a toroidal transformer of 2xl8V/120W and 16x2200uF/35V for box 'A'. Supply voltage of the control circuit is derived from the supply of the power amplifiers and stabilised by 7815 and 7915 regulators. Every opamp's pin 4 and 8 arc direct connected to earth via an lOOn capacitor.
All the circuits are low impedance so there should be little hum and noise. With an input resistance of 680 ohms there was -81dBV hum and noise at the woofer and -88dBV at the tweeter connections measured in JIS A.
Designing the enclosures
There are three cases to design for the different speakers. Firstly the bass speakers.My experiments with vented constructions did not lead to a satisfying bass reproduction. In addition the electronic filters, mechanical constructions and the damping associated with vented enclosures were relatively complicated. So I chose the infinite baffle solution, which is very easy to damp effectively with sheep's wool. This agrees with reference 3, as above earlier.
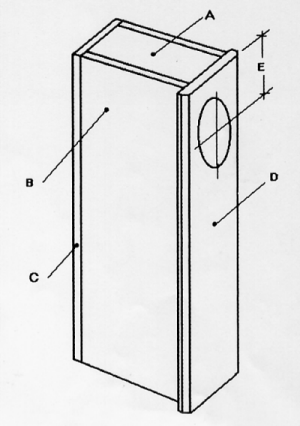
Fig. 7
Construction of the box enclosure is simple. As the front panel extends beyond the periphery of the box, the construction seems smaller. The minimum speaker diameter determines board A. The rest is a compromise between box volume, box proportions, and aesthetics. Some propsals are made in Table 2.
In Fig. 7, front board D is 19mm beech plywood. Building the side and rear boards A, B and C of 16mm chipboard with beech imitation veneer is a cheap solution. The front and rear panel involve the baffle cuts.
To avoid precise wood working, the front panel protrudes on all sides around 1cm. The woofers drive in opposite directions, so there is no need for heavy wood construction. Dimensions for diverse layouts are shown in Table 2.
| Box A | Box B | Box C | |
|---|---|---|---|
| Minimal speaker diameter | 13.8 cm | 16.6 cm | 21 cm |
| Board A, 19mm (x2) | 14 x 20 | 17 x 25 | 21.5 x 25 |
| Board B, 16mm | 89 x 20 | 98 x 25 | 110 x 25 |
| Board C, 16mm | 80 x 17.2 | 98 x 20.2 | 110 x 24.7 |
| Board D, 19mm | 82 x 19.2 | 100 x 22.2 | 112 x 27.7 | Volume | 21.5 litres | 40.3 litres | 57.4 litres | Distance E | approximately equal to speaker diameter |
For the mid and high-range speakers, I stumbled upon an ideal, low-cost enclosure solution while playing with my granddaughter and her styropor sphere kit.
I used wool-filled styropor spheres with diameters of 7.5 and 10cm for the small 4cm tweeters. As the mid-range speakers need a small volume of air, hollow spheres of 15, 20 and 25cm diameter can be used depending on the enclosure configuration you choose.
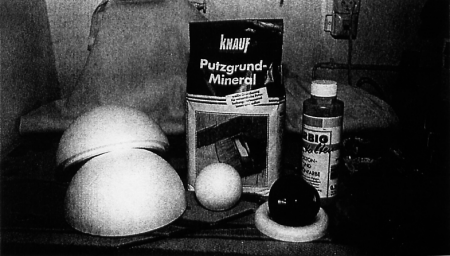
Fig. 8
This is the inexpensive material-mix to build the sperical 'boxes'. The styropor spheres are an optimal acoustical solution as the styropor damps well and the sphere is the optimal form for radiating sound. The soft surface can be stabilised with ordinary papier mache. If you coat all this with mineral material you get an attractive enclosure.
In Fig. 8 you can see the spheres with some speakers at the right side and other materials I used. At 2cm, the thickness of the styropor wall provides very good damping so no sound from the rear of the speaker radiates into the environment. The sphere surface causes no diffractions, and this yields a precise stereo image; the instruments are fixed in the room and the stereo area is enlarged.
The closed boxes are damped with sheep's wool. The speakers in the midrange sections exhibit g-rc values of about O.'6-0.7, which I can live with.
Because the surface of the styropor parts is very soft, they have to be stabilised. Here begins the artistic phase of the design, because I recommend coating the surfaces with papier mache. The stability increases enormously, but each sphere requires about an hour of art work.
With the speaker mounted, the sphere will roll due to its weight so a counterbalance is needed.
A papier mache surface doesn't look very nice. I applied a second coat of a cement-based material, which resulted in a very high quality surface. This coating increased the weight too, giving me a perfect enclosure for a total of about £2.50.
The tweeter spheres are so set up that their voice coils are vertically in line with those of the mid-range drivers, whose voice coils are in turn lined up with those of the bass units. In this way, all the speakers radiate from the same plane, resulting in phase-linear radiation. Figure 9 shows the results of my efforts.
Mounting details
Mounting the speakers into the styropor is a little difficult. A 2cm deep hole whose diameter suits the mounting requirements of the chosen speaker needs to be sawn. Next, stabilise the styropor surface with PVA glue.Smaller speakers can now be fixed with silicone adhesive. With larger mid-range units, it may be advisable to glue a wooden ring on to the face of the sphere and screw the speaker to the ring, ensuring air-tightness,
I used screw terminals on the bottoms of the mid-range spheres to make it easier to connect the cables. To set up the spheres on the bass enclosure, a wooden board of appropriate thickness and with an appropriate hole is the simplest solution. Cutting a groove into the lower side of it allows you to make the cables invisible.
In all the suggested layouts, the rear panel is long enough to carry all the modules. Mounting the reservoir capacitors at the lowest point is advisable since it is the coolest. Just above them should be the mains transformer. An inrush limiter comprising 2x1 (XK2 resistors follows and in the middle of the panel there is the main heat sink with the four power amplifiers.
At the left-hand side are the control circuit and the cables connecting the level-setting potentiometers. The rear speaker comes next and at the upper end there are the power switch, the fuse and the LEDs indicating 'mains voltage present' and 'power on'.
As all sections and one speaker are mounted together, the whole arrangement is easy to test. In Fig. lOa), on the left within the enclosure, you can see the damping material. To avoid creating earth loops, do not connect cable; screening at the power amplifier end.
In my environment, the speakers are set up in front of the windows, Fig. 11 a),so that they radiate into the damped living room. This results in an equalised sound pressure indicated as Fig. 11 b).
There is no need to sit exactly between the two loudspeakers. Sometimes it seems as though the speakers are not working, yet the room is filled with music.
An alternative solution, where speakers built following the same design procedure are mounted in a book shelf, is shown in Fig. 12a). The black boxes you see are bass units measuring 64cm by 44cm by 24cm.
Looking at Fig. 12b), you can see the push-pull arrangement of the bass speakers radiating in vertical direction and the associated spheres. The influence of the comer position is evident in Fig. 12c). The extreme values at the lower frequency end are caused by room influences.
This alternative uses very inexpensive speakers. In every case the sound pressure achievable is astonishing, proving Mr Linsley-Hood's statement.
In summary
Listening to music from these boxes comes close to my dream. They sound good, but they also look good - so good in fact that my wife finds them acceptable!
Speaker sources
Seas and Monacor loudspeakers are available from Wilmslow Audio, tel. 01465 286603, Wilmslow web siteGradient products can be found at here
Determining component values for the low-bass equaliser.
| Box A | Box B | Box C | |
|---|---|---|---|
| Possible speaker type | SPH135TC | W170/4 | SPH200TC |
| Baffle cut out | 123mm | 150mm | 185mm |
| Free air resonance | 40 Hz | 37 Hz | 28 Hz |
| Total Q factor | 0.42 | 0.42 | 0.24 |
| Complete equivalent vol. | 2 x 16 litre | 2 x 40 litre | 2 x 65 litre |
| Impedance | 2 x 8 ohm | 4 ohm | 2 x 8 ohm |
From this speaker data and the volume information in Table 2, the following values can be arrived at, as detailed in the equations.
| Box A | Box B | Box C | |
|---|---|---|---|
| Ra | 10K | 10K | 10K |
| Ra | 10K | 10K | 10K |
| Rb | 25.8K | 30.65K | 70.45 |
| Rc | 63.7K | 102.2K | 63.98 |
| Ca | 765.6nF | 915.1nF | 1.23uF |
| Cb | 83.1nF | 67.7nF | 80.21nF |
| Cc | 120.2nF | 89.56nF | 192.8nF |
Last update: 12th November 2004 - Copyright © 2004 - Website Author Nick Whetstone. Material copyright - Christof Heinzerling.