|
Decibel Dungeon
|
|
|
|
I note from the entries typed into the search facility for this site, that a number of you are looking for information on the Class-T digital amplifiers! So here, hopefully without duplicating what I have written for TNT, is a section on these marvelous little amplifiers. If you want to read my TNT review, click here.
|
|
First off, what is class-T and what is class-D? Class-D are digital amplifiers although that is a bit mis-leading. But it's too technical to go into here, even if I did fully understand it all myself. You read more about this type of amplifier here on Rod Elliot's marvellous ESP site. Class-T is a type of class-D amplifier that uses a Tripath chip, so the 'T' is for Tripath!
|
|
The class-T amplifier really came to prominence with the arrival of the Sonic Impact SI amplifier. This little marvel received rave reviews all over the place and consequently sold like hot cakes. My own experience of the SI amplifier is that it isn't quite as good as some reviewers would have you believe! Even modified, it still wouldn't be my favourite means of amplification although it must be said, that for the money, it produces some amazingly good sound.
|
|
The success of the SI amplifier no doubt encouraged the production of some other class-T amplifiers, mainly available to the DIY market as kits or ready-built modules. The modules that I have tried so far are the:
- The Sonic Impact T-AMP.
- The Autocostriure 2020 amplifier.
- The DiyParadise Charlize (2020)
- The 41 Hz AMP-3.
- The 41 Hz AMP-6.
You can read my review of the first four here on the TNT site.
|
| Site menu
Page menu
|
|
|
Well, if you have read my review article at TNT, you will know that I think very highly of these amplifiers. You would have to spend many times more to achieve similar results with other types of amplifier although I still rate the Gainclones very highly as well. What you get with the class-T amplifiers is even more detail than with the GC, a huge, three-dimensional sound stage and well-defined bass. Given that the price of these amplifiers is so low, I would recommend anybody to at least try one of them in their system. But you will benefit from easy-to-drive efficient loudspeakers as these little beauties are driven by a small 12 volt power supply and, despite their greater efficiency, are obviously limited in their power output!
|
|
But if you are looking for a low-cost, simple but high-end system, you could do much worse than couple one of the class-T amplifiers with full-range speakers using something like a Fostex driver. You will then have the basis of a very good system.
|
| Site menu
Page menu
|
|
|
So what's involved in building a class-T amplifier? Well, you can choose to build a kit yourself, or go with a ready-built module. Obviously this will depend on your level of expertise (and also to a lesser degree on your budget). Be warned though, the kits using surface-mount components can be very difficult to put together! Although this is a DIY site promoting DIY hi-fi, I am tempted to say save yourselves some trouble and by one of the assembled 2020 modules from the likes of Autocostruire or DiyParadise! This would leave you with the job of fitting the module into a case and adding a suitable power supply.
|
|
Here I will explain exactly what is involved in turning a module into a completed amplifier. If you are building a kit yourself, I will assume that you already know enough to do this!
|
|
Find a suitable enclosure. The class-T amplifier modules tend to be small, very small and will fit in quite a tiny enclosure. However, you don't want something that is so small that there is not enough room to install all the connectors that you will need. As a minimum, you will need two input sockets (RCA (phono) etc) and four speaker terminals. If you use an exterior power supply, you will need a connector for that as well! The pods described here are most suitable for the class-T amplifiers!
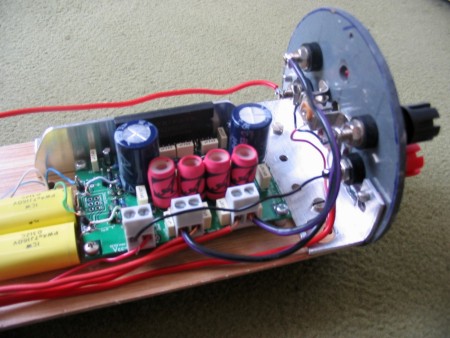
The Audiodigit 2020 amp module in a 'pod'.
|
|
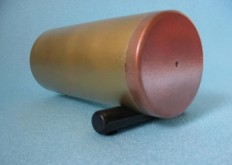 Some people recommend a metal case as the class-T amplifiers are said to emit a lot of RFI. I have not found this in practise and have been quite happy with all my class-T amplifiers in plastic cases like the one shown on the right!
|
|
At this stage, you should also decide on whether you want an on/off switch with the amplifier. Some people are happy to just switch the power supply on and off but I have seen reports of this causing problems with some class-T amplifiers. The problems arise because some power supplies take a second or two to 'settle down' when they are turned on or off. The resulting surge in voltage could cause damage to anything connected to the PSU at the time. For that reason, I think that it is good practice to use an off/switch in the amplifier, as well as in the PSU!
|
|
And while we are on this subject, let's talk about the noise that these amplifiers produce when they are first powered up. Depending on the size of the input capacitors, the class-T amplifiers can make quite a nasty noise through your precious speaker cones when they are powered up. Fortunately there is an easy way around this!
|
|
There are two versions of the same solution. One will minimize the noise down to an acceptable level, the other will get rid of it altogether but will add a switch in between the output of the amplifier and the speakers. You may care to have that facility anyway, and I have not heard any difference with the switch in circuit!
|
|
You will need something like a 270R to 330R resistor; a 0.25 watt type is fine. This needs to be installed between your 12 volt power supply and the class-T amplifier in such a way that it can be switched out (ie shorted). I have found a rotary switch to be ideal for this job. If you use a four pole three position type, you can use one position for power off, the next position for the resistor, ie power partly on, and the last position for the direct connection to the PSU, ie power fully on. Now when you power up, turn the switch to position two, wait a second or two and turn the switch to position three. It works because the resistor allows some power to the amp but not enough to make a loud noise. The input capacitors start charging so that when you turn the switch to short the resistor, there is no big rush of power to the input capacitors, hence no big noise.
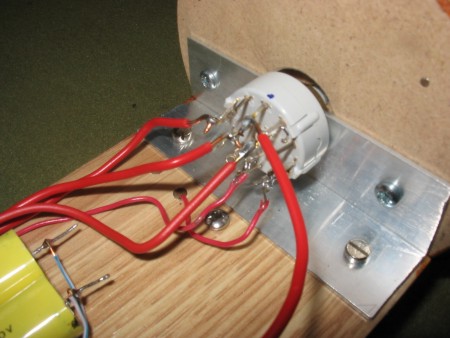
The rotary switch wired to switch power and speakers.
|
|
If you use a three pole, four position switch, you can use two of the spare poles to switch the speaker connections too! Position one would be power off, speakers off, position two would be power on, speakers off, and position three would be power on, speakers on. In this case, the amplifier gets full power but the speakers are not connected so you don't hear any noise.

The simple soft-start circuit using a single resistor that is shorted out after a second or two. The switch is shown in the 'off' position.
|
|
Another option is to use the NE555 dealy cicuit shown in the Gainclone section. By using the normally open mode of the relay, instead of the normally closed, this circuit can be used to control the power to the amplifier. Normally, the contacts of the relay are open and the power supply to the amplifier runs through the resistor (270R-330R). After a delay, the contacts are closed and the resistor is bi-passed and the amplifier receives full voltage. This is a more sophisticated way of achieving a soft start with a T-amp becuse it is automated. Make sure you use a suitably rated relay (the one I used is rated at 8 amps - single pole will do here of course) and to add that 10n capacitor between pin 5 of the NE555 and ground.
The simple soft-start circuit using a single resistor that is shorted out after a second or two. The switch is shown in the 'off' position.
And don't forget that you can also use the 555 delay circuit to utilise the mute pins on the class-T amp!
|
|
Once you have decided on a case, you will need a way to fit the module inside it. You could use anything here from hot-melt glue (but not really recommended) to the proper PCB stand-offs that come in a variety of shapes and sizes. Or you could use nuts and bolts and make your own spacers that go between the PCB and the case. Before you fix the module into the case, do make sure that you have soldered on all the connecting wires!
|
|
Having fixed your module into the case, you will need to solder the connecting wires to the relevant sockets. Try to keep these wires as short as possible. For this job, I recommend solid-core wire such as the type used in CAT5 cables. You may care to use something a little bigger for the speaker connections!
|
|
Take care when soldering all the leads between the amp and connectors. Make sure that you don't reverse the phase or swap over the channels. And try and keep the wired carrying the power away from the signal wires (a few milimetres is fine).
|
|
Other things to think of at this stage are:
- The connection to the power supply (if it is external).
- A switch to connect the power.
- An LED to indicate power on (if you want one).
|
| Site menu
Page menu
|
|
|
In this section, I am referring to the class-T amps that require a single rail supply. This is usually between 12 and 13.5 volts DC.
|
|
I have tried four types of power supply with the class-T amps. They are:
- A wallwart. This is the sort of thing that plugs into the mains supply and supplies either a fixed voltage, or a user-selectable voltage. You find these used for all sorts of equipment like printers, scanners, cameras etc. They are usually fairly cheap but what you need to look for is something that has enough power, ie enough output current. You should expect at least a couple of amps and five or six is much better.
- A home-made regulated supply. I built myself a regulated supply with a 12 volt output although this could easily be changed to 13.5 volts. It uses a 120VA 12 volt toroidal transformer, some 10K reservoir capacitors and a pair of LM338 voltage regulators. It's a very simple circuit based on the LM338 data sheet.
- An SLA (sealed lead acid) battery. This was used with and without a 10K capacitor across the output.
- An SMPS (switch mode power supply). You can see the one that I used here. Again, the SMPS was used with a 10K capacitor across the output.
In order of preference, I preferred the SMPS best, the battery, the regulated supply and then the wallwart. The SMPS was clearly the best sounding supply and once I had tried it, I had no desire to use the other supplies!

The simple PSU circuit. The capacitor can be anything from 10 uF to 10K uF but should be a good quality item.
|
| Site menu
Page menu
|
|
|
T-amp suppliers:
Sonic Impact, suppliers of class-T amplifiers.
DiyParadise, suppliers of class-T modules.
Autocostruire, suppliers of class-T modules and kits.
41Hz, suppliers of class-T kits.
T-AMP tweaking:
Tweaking the SI T-AMP.
Tweaking the SI T-AMP.
Digital amplifier forums:
Class-D forum at diyAudio.
|
| Site menu
Page menu
|
|
|
