|
Decibel Dungeon
|
|
|
|
At the time I purchased my first 'proper' hi-fi system, CD had yet to be invented and the first choice for a source component was almost always a turntable. I wasn't into hi-fi so much at that time and I just played records, enjoying the music, never thinking about the quality of the recording or the equipment that I was playing it on. In 1987 I bought my first CD player and gradually began a move away from vinyl as I built up my collection of CD's.
|
|
About three or four years ago I started to pay more attention to the equipment that I was using, as well as the music that I was listening to. As I read hi-fi magazines and then discovered the internet I read about a seemingly fanatical bunch of people who not only expounded the merits of vinyl, but even dared suggest that it was a superior medium to CD.
|
|
My memories of playing vinyl didn't exactly coincide with that view although, to be fair, I had never actually owned anything better than a budget turntable myself. At first I assumed that these vinyl junkies were just a bunch of luddites and would eventually join the rest of us in the twentieth century.
|
VINYL JUNKY -An audiophile who cannot possibly get enough LP's. Seen regularly in record shops, charity shops and boot sales etc. Bores all to death with talk of first pressings, stylus force, VTA, record cleaning recipes and how bad CD sounds :-)
|
| However, the more I heard and read about playing vinyl, the more I wondered if they could actually have a point. One of my main hi-fi philosophies is that the only way to truly know if something works is to try it for yourself and now, with my DIY approach to hi-fi, I felt that I could probably afford to put together a good enough turntable to test out the theory for myself.
|
|
When I found a secondhand Rega Planar 2 turntable for sale a few streets from where I live, I quickly snapped it up at a price which I felt would enable me to keep within the £250 budget I had set for the project.
|
REGA PLANAR 2 -A hugely popular budget turntable which offers very good results for the money. Interest in the Planar2 has been rekindled by the discovery that its tone-arm, the RB250 is top class with a spot of tweaking.
|
|
At that time my main hi-fi system did not have a phono stage so returning home with the Rega, I set it up in another room with an old amp and speakers. This wasn't really a fair test and after playing a couple of albums I was left wondering what all the fuss was about, and even considered selling on the Rega to get my money back! But that would have been like giving up at the first hurdle so I quickly put the idea out of my head and set to work thinking about what I what I could do to improve the turntable within my fairly tight budget.
|
| Site menu
Page menu
|
|
|
|
|
A turntable is not (or doesn't have to be) a very complicated item. However, building one to perform well involves solving some complex problems to do with issues like vibration control. Fortunately, this doesn't involve going out and taking a degree course on the subject as many of the problems can be solved by trial and error.
|
|
The first job was to decide how much of the Rega I would retain. The arm which it came with, the RB250, was deemed reasonably good as standard, and with some modifications was reputed to perform very well. I also decided to keep the bearing, the sub-platter and platter. However, I chose right from the start to use a DC motor rather than the AC version which is found as standard on a majority of turntables. From my research, most (but not all) turntable builders agreed that a well implemented DC motor would out-perform an AC type.
|
|
The plinth of the Rega Planar is very basic, a rectangular lamination of chipboard and hardboard with two holes drilled to accept the bearing housing and the tone-arm. I felt that this was one area where I would have the time and skills to be able to produce something much better.
|
|
So my initial plan evolved as follows:
|
|
- Use the original bearing/sub-platter and platter
- Build a better plinth
- Modify the tone-arm
- Replace the AC motor with a DC type
|
| Site menu
Page menu
|
|
|
|
|
There are basically two types of plinth system for a turntable; a non-suspended design (as with the Rega Planar) or a suspended design, where the plinth is suspended on a sub-chassis.
|
|
There are various methods of suspending or decoupling the plinth from the sub-chassis. These include; springs, spikes, rubber bands, levers and string. I decided to go one step further and have two (or more) levels of decoupling rather than one. In addition I wanted to try out a method of further reducing any vibrations in the turntable structure.
|
DECOUPLING - The process of minimizing the effect of one part of a circuit or mechanism with another. eg placing a piece of compliant material between two hard surfaces or using a filter between parts of an electrical circuit.
|
|
When the stylus follows the groove in a record it is caused to vibrate thus (re)producing the music signal. Any other vibrations which the stylus picks up which have not come from the record groove will obviously add other unwanted bits to the signal. Getting rid of unwanted vibrations in turntables, or at least preventing them from getting into the signal path via the stylus has always been a holy grail for turntable builders.
|
|
One of the main problems is that even if you manage to completely isolate the turntable from external vibrations, there is then no 'path' for the unwanted vibrations produced by the turntable to be routed away. As we know, vibration is a form of energy and energy cannot be destroyed. So what is the solution?
|
|
My answer was to try and change the energy producing the vibrations into some other form. One way of doing this has been used for equipment supports and I had used it to make an experimental CD platform which had performed well. The method is to use something like sand, contained in 'pockets' in a structure. When the sand is vibrated, the particles rub together and the resulting friction produces heat. Thus, some, or all of the movement is changed to heat which dissipates into the atmosphere. (unfortunately not enough to warrant getting rid of your heating system!)
|
|
The design below is the result of all the theory. It allows for plenty of experimenting without having to completely rebuild the turntable.
|
|
|
The plinths and arm board are constructed from layers of MDF (cheap and easy to shape). By using three layers and cutting holes in the middle layer, it is also easy to create the 'pockets' for the sand.
|
|
The foam pipe insulation currently used to support the sub-plinth, is one area ripe for experimenting. Watch this space!
|
| Site menu
Page menu
|
|
|
|
|
Sometimes in DIY hi-fi you have to do a lot of research on a project but in the case of my tone-arm modifications, someone had already come up with the solution. Mark Baker of Origin Live, an English company that specializes in turntables had published details of his suggested modifications to the Rega 250 (and other Rega arms). Apart from replacing the tone-arm wiring he also recommended certain structural alterations to make the arm more rigid.
|
Click here to see full details of these modifications (which you can also have done by Origin Live). Also see a review of these modifications on the TNT audio site.
|
|
As I was lucky enough to know of someone who could do the necessary machining, I went ahead and did the structural modifications to the RB250. At the present time, I have the new wires but have not yet got round to rewiring the arm.
|
|
I am grateful to Chris Pritchard who has supplied the following information as regards the colour coding for tonearm wiring.
Black - Floating earth to phono earth on the amp
Red - Right +
White - Left +
Blue - Left -
Green - right -
|
| Site menu
Page menu
|
|
|
|
|
Having already made the decision to use a DC motor, the only problem was to find something suitable. My first candidate came out of a defunct budget stack system in which it was used to drive the flimsy plastic platter. Although I got it to work, it found driving the much heavier glass platter of the Rega a bit too much. Speed stability was terrible, with even a difference in stylus force causing the speed to vary.
|
|
Next I tried a few examples from a 'dead' video recorder. These were only slightly better and didn't solve the problem of speed instability. The problem occurs because the load affects the motor speed to some degree. The load can vary according to stylus force, the weight of the record and even the part of the record which the stylus is tracking. The ideal solution is to have some sort of feedback system which can adjust the motor speed according to the load. As I was looking around for such a system which I could build, somebody kindly offered me a couple of high quality DC motors which had come from an industrial quality tape deck. Using one of these, the speed instability seemed to disappear; at least I couldn't hear any fluctuation. I am now planning to experiment using two motors as there is an argument that this will be beneficial. When time allows, I will write more about this theory.
|
|
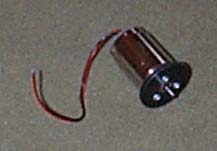
High quality DC motor from industrial tape deck
|
|
Meanwhile, I am also looking at alternative power supplies for the motor(s). At present I am using a PWM system which was originally designed for controlling small electric drills and model train-sets. I have been advised that this is not the ideal solution although it seems to work OK at present. As ever, only experimenting will show whether I can make a big improvement.
|
|
Read a review of a DC motor upgrade on the TNT audio web pages.
|
| Site menu
Page menu
|
|
|
|
|
|
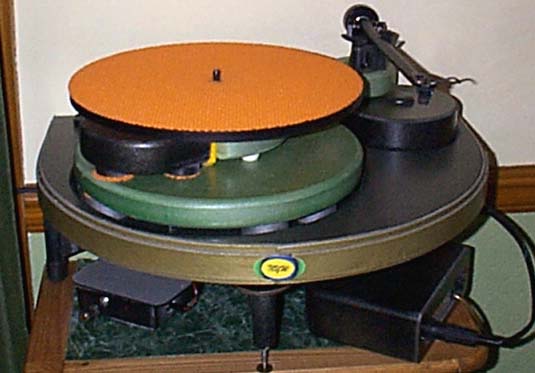
Here's the result of about one year's planning and building. This is more or less a prototype and I intend to do quite a lot of experimentation to squeeze the last bit of performance from this design.
|
|
I am currently using an Ortofon 530 mm cartridge which was chosen primarily on cost. One reason I wanted to work on such a tight budget was that I was not sure if vinyl would appeal to me as much as it obviously did to the 'vinyl junkies'. I didn't want to risk spending a lot of money only to discover that turntables weren't for me.
|
MM - stands for 'moving magnet'. MC (moving coil) cartridges are considered superior but usually cost more and have a lower level of output, requiring extra gain in the phono stage.
|
|
Another 'tweakable' feature of a turntable is the platter mat. This is another hi-fi item which has spurned much debate and a host of commercial products all claiming to be the best solution. So far, I have tried out the original (Rega) felt mat and one made from thin cork but am most pleased with the one I am currently using.
|
|
This is cut from a sheet of rubbery mesh material which is sold as a 'non-slip' mat for use on draining boards. It does seem to grip the record and I should imagine that slippage is just about zero (records do slip slightly on most mats). Anyway, at a cost of 50 pence, it is worthy of an audition on any turntable. The fact that is does seem to grip the record probably means that a record-clamp is less necessary although it would be sensible to use one for clamping a slightly warped record to the platter.
|
|
I suspect that the type of turntable mat that will work best on a turntable will also depend on other factors such as the type of material used for the platter but as it's easy to experiment (you only need to cut out a circle of the material you are trying) this is another area of turntable tweaking which can be explored fully without too much expense.
|
|
Fortunately, this turntable has fully justified all the time, effort and funds that have gone into it. It has totally rejuvenated my love of hi-fi and even sent me back out to the charity shops and boot sales on the hunt for more LP's. I can now also justify spending a bit more money on developing the project, so items like a better cartridge can go on my 'wish list'. I would go so far as to say that the turntable project has given me the most satisfaction that I have enjoyed from any of my DIY hi-fi projects!
|
A good place to find out How to set up a cartridge. And check out this informative thread on how to properly load a cartridge by Carlos Machado.
|
| Site menu
Page menu
|
|
|
|
|
Perhaps it is not strictly considered part of the actual turntable but as my phono stage sits on the main plinth directly beneath the base of the tone-arm, I will mention it here.
|
PHONO STAGE - An electronic circuit with two functions. One: amplify the very small signal from the cartridge prior to the preamplifier stage. Two: correct the frequency response which was altered during the production of the record.
|
|
I wanted to situate the phono stage as close as I could to the wires coming from the tone-arm in order to do away with an extra interconnect. This was fairly easy to accomplish although having to fit the electronics into a confined circular shape meant a few extra hours laying out the circuit design.
|
|
|
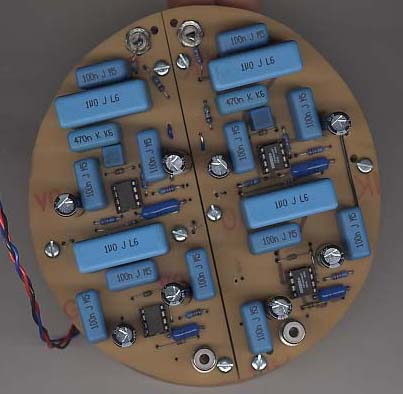
The circuit was actually designed for me by a friend and, as usual, I made my own PCB's by drawing out the design on copper-clad boards and then etching them. I have provided a fuller description of this process here.
|
|
Phono plugs attached to the tone-arm wires plug directly into each PCB. Phono sockets, situated so that they face downwards (top of picture), allow the interconnects to my preamp to be plugged in from underneath the main plinth, thus keeping the top of the turntable as free of clutter as possible.
|
|
Future plans include replacing the OPA604 op-amps with some OPA627's (when finances allow). I will also be experimenting with the 1.5 metre interconnects which connect the phono stage to the preamp.
|
|
As of May 2006, I am pleased to announce that details for building a top quality Jfet based discrete phono pre-amp (designed by Carlos Filipe Machado) are now available here.
|
|
If you don't feel up to the job of building your own phono stage, there is a wide choice available to buy ranging in price from about £30 upwards. These 'stand alone' phono stages are usually of a better quality than those which are built into some preamplifiers and integrated amplifiers. Click here to see some.
|
| Site menu
Page menu
|
|
|
|
|
A hi-fi DIY project is never 'finished' and a turntable offers almost unlimited scope for modification. Even the type of materials used in the construction affect the sound and we could spend a life-time trying them all.
|
|
I have already mentioned better methods of controlling the motor, VTA adjustment and looking out for a better cartridge, I would also like to modify the platter and replace the standard Rega bearing with something superior.
|
VTA - Vertical Tracking Angle is the angle between the stylus and the surface of the record. VTA is set by adjusting the height of the tone-arm. It is not possible to have the optimum VTA for all records due to their different thicknesses.
|
|
|
Several suppliers offer a VTA upgrade but I'd rather 'do-it-myself'. I want to include a precise method of adjusting the tone-arm height, rather than just using a sleeve and having to raise and lower the arm by hand.
|
|
The 'collar' is threaded, so rotating it about the threaded part of the tone-arm base causes the arm to move up or down. To stop the whole tone-arm assembly rotating, a small grub screw is inserted into the threaded tube of the tone-arm base. This locates into a vertical slot cut into the sleeve. Once the height has been adjusted, it is locked in place using the socket screw.
|
|
If cost is not an issue, the recommendation is to go for a machined acrylic platter about two or three inches thick. As this will be outside even my increased budget, I intend to experiment with MDF. The idea is that the heavier the platter, the more stable the rotational speed. It's just like fitting a flywheel to an engine where (kinetic) energy is stored in the increased mass. This energy then helps compensate when the power from the motor is insufficient due an increased load.
|
|
As regards a new bearing, I hope that the friend who did the modifications to the tone-arm will be able to help out again. Alternatively, there are several sources of 'super' bearings like the one from Mantra Audio.
|
|
I'm sure that I will find other things to do with my turntable and I don't even rule out a complete rebuild using different materials. For more ideas about turntables, try some of these links:
|
|
'TERES', a serious high-end turntable project.
An interview with turntable builder Carlo Morsiani.
|
|
A test LP is invaluable in setting up and optimising any turntable whether you have bought it or built it yourself. One of the most recommended test LPs is the one supplied by British Audio Products Online (Makers of the HFN Test LP). BAPO have kindly offered a 10% discount off their test LP to Decibel Dungeon visitors. All you have to do is mention that you read about the LP on this site when you order it.
|
| Site menu
Page menu
|
|
|
