|
Decibel Dungeon
|
|
|
|
It seems a long time ago that I first read about the Gainclone. I couldn't believe that they sounded any good, certainly not as good as people were claiming! The concept went against most of what I had learned during my DIY hi-fi experience; I had spent years modifying my trusty Arcam A60's and now I was being told that I could build something better in an evening! But I took a gamble, built one and have not looked back since! I went on to add buffers (opamp, discrete, valve), try the T-Network feedback resistor arrangement, build a regulated power supply and a snubberized one too. I was beginning to think that there was nothing else left to try with the chip amps when somebody offered me the chance to play with a Switched Mode Power Supply (SMPS).
|
|
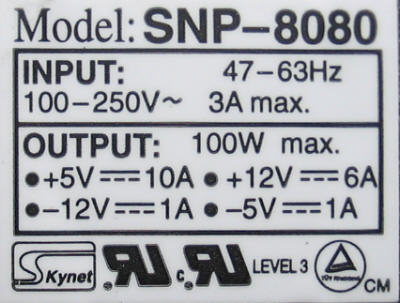
Now, all my Gainclones have sounded very good and I prided myself that this was in part due to the care I had taken building the power supplies. SMPS, I thought, were fine for computers but surely not suitable for audio. Well, was I in for a surprise! The units that I had at my disposal (yes I had four of them to play around with) were Skynet 8080's. They have the following outputs:
- +5 volts at 10 amps
- -5 volts at 0.5 amps
- +12 volts at 6 amps
- -12 volts at 1 amp
Well +/-5 volts is too low to power my test-bed LM3875 inverted Gainclone but +/-12 volts will do. Fortunately, I have efficient speakers so the low power obtained from a +/-12 volt PSU is not a problem as regards adequate volume levels. There is one problem though. The negative 12 volt rail is only rated at 1 amp. The weak link is the negative regulator. Anyway, keeping this in mind, I decided to 'dip my toe in the water' and try just one module first.
|
| Site menu
Page menu
|
|
|
As in all good reviews, I'll just run through the test system.
- Source, Cambridge Audio CD5, slightly modified.
- GC pre-amp described here .
- Amp, LM3875 inverted Gainclone with 1000uF on each supply pin.
- Speakers. IPL A2 kit speakers (mine are MkIII model - Sensitivity 89 dB SPL).
|
SPL - Sound pressure level. Given in decibels (dB) is an expression of loudness or volume. A 10db increase in SPL represents a doubling in volume. Live orchestral music reaches brief peaks in the 105db range and live rock easily goes over 120db.
|
|
Please note, I did not employ a low pass filter in the above amp.
|
|
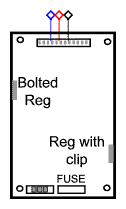
Connecting a single SMPS for +/-12 volts.
Blue = 0v - Pin 6
Red = +12v - Pin 8
Black = -12v - Pin 10
|
|
Surprisingly I didn't notice any problems with the single SMPS although I didn't push the volume level up too far. The sound quality was excellent. All the things that I love about the GC were there but 'more so'. One of the first things that I noticed with my original GC was that I could hear words (and other small details) in songs that I had not heard before. The SMPS took this even further, the clarity was stunning. There was more 'air' between different instruments. Acoustic music, jazz, folk, chamber music and the like had much more intimacy. But biggest surprise of all was the bass. At first I made the classic mistake of thinking that there was less. But no, it was all there, just much better controlled. Acoustic bass especially was a revelation and I have never heard it reproduced so clearly in recorded music!
|
|
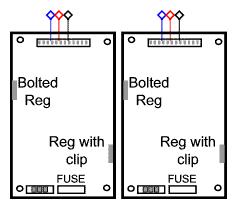
One SMPS per channel.
Blue = 0v - Pin 6
Red = +12v - Pin 8
Black = -12v - Pin 10
|
|
I honestly didn't want to stop listening to my 'new' GC but there were three more SMPS sitting on the bench beside me. The next step was to use one module per channel. This time I took the volume levels higher but again noted all the improvements that I had found with the single module.
|
|
Note, from here the 12 volt negative output is NOT used!
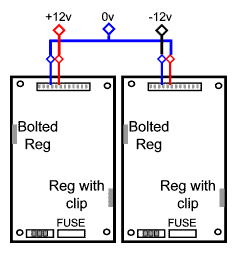
Connecting two SMPS for +/-12 volts.
|
|
The next step was to get round the limitation of the low power rating on the negative rail. This required wiring two modules in series but to do this I had to isolate the output from the mains earth (or I would have shorted the output of one module to the ground of the other and got a lot of smoke!). Fortunately, this proved fairly easy once I had seen the underside of the PCB. I converted two of the modules and wired them up so that both positive and negative 12 volt rails were rated at 6 amps. Once again, I noticed very little, if any difference between this arrangement and the previous ones as regards sound quality, but, theoretically at least, it is a much more robust PSU.
|
|
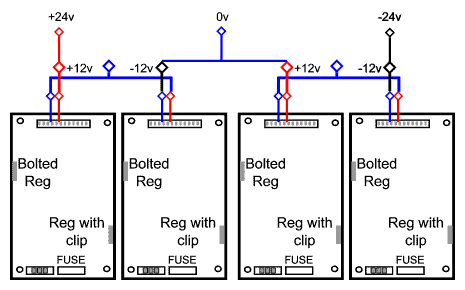
Connecting for SMPS for +/-24 volts.
|
|
The final step was to modify the two remaining SMPS and then wire the four modules in series to obtain a +/- 24 volt supply. While I found 12 volt rails absolutely fine, less efficient speakers will probably require the 24 volt rails, especially if you like to play your music very loud.
|
|
From the moment that I pressed the play button on the CD remote control, I noticed a difference between the +/-12v and +/-24v supplies! The former was more 'delicate', more intimate, 'airy', very alluring. The latter was slightly darker, heavier, more authoritative. If I am honest, I probably just prefer the 12 volt supply but for certain types of music, eg rock, the 24 volt supply is better. The control that the 24 volt supply has over even difficult and complicated passages is simply stunning. Is this the reason that Linn use SMPS in their amps?
|
|
So which is better overall? Don't ask me to come down definitely on one side of the fence or the other although I am very tempted to try running the 12 volt supply for a while. If I was 'forced' to live with either supply, I would still be a very happy man which ever one I landed up with. 24 volts or 12 volts? It's another one of those damn hi-fi compromises where it depends on personal taste, partnering equipment and choice of music. But with both options, clarity was better, sound stage was wider and deeper, bass better controlled, and the sound very linear. And although I was running the speakers with their passive crossovers, at times, I could have believed that the actives were there instead, such was the clarity and speed!
|
|
To sum up, I would say that the addition of the SMPS to my Gainclone has made the largest improvement that I have experienced so far, even out-doing the buffer(s). At the time of writing, I have yet to try the snubberized regulated PSU that Carlos assures me is very good too but I can hardly believe that it will better the SMPS!
|
|
I should also report that neither SMPS modules nor LM3875, ran at all hot during any of my listening sessions. This is in contrast to the LM338 regulated supply that does seem to make the chips run hotter!
|
|
So is SMPS the way to go with the GC? If you ask me I would say a definite "yes", based on what I have heard over the last week. Some may argue that the +/-24 version with four modules is bulky, but at 360mm (14 inches) by 150mm (6 inches) and only 40mm (1 1/2 inches high), it's not difficult to accommodate in a standard amp housing or a separate housing if you prefer. I prefer to use one toroid PSU for each channel so there's not a lot in it space-wise between that and the SMPS arrangement!
|
| Site menu
Page menu
|
|
|
In order to connect two or more of the Skynet 8080 SMPS together, the outputs need to be isolated from mains earth. If this were not done, the units would be short-circuited and there would be smoke before your mains fuse blew! Fortunately, it is easy to do the conversion and I will explain how to now.
|
|
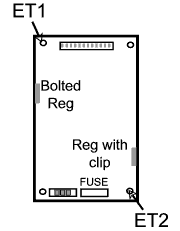
The 8080 SMPS layout.
|
|
- Unbolt the (bolted) regulator from the side of the chassis.
- Unscrew the metal clip securing the other regulator from the opposite side of the chassis.
- Remove the four screws, one from each corner, that hold the PCB to the chassis.
- Carefully remove the PCB from the chassis being careful not to loose the isolating pad that goes between the bolted regulator and the chassis.
- Note the metal tab shown as ET1 on the above diagram. Turn over the PCB and de-solder, and remove this metal tab.
- Replace the isolating pad so that it's hole is aligned with the one in the side of the chassis. If you clip this between the chassis and the stiff plastic isolating sheet it should be held in place while you put back the PCB.
- Slide the PCB back into the chassis.
- Bolt the (bolted) regulator to the chassis.
- Screw the clip securing the other regulator to the chassis.
- Replace the two screws at the end of the PCB where the mains fuse is located.
- Slip a thin piece of plastic between the metal pillar and PCB under the hole where you removed the metal earth tag. Mark the hole with a pen, withdraw the plastic and drill a 3mm (1.8th inch) hole where you made the mark with the pen. Slide the plastic back in position and put in the screw that holds the PCB to the chassis.
- Replace the remaining screw between PCB and chassis.
|
|
The output should now be isolated from the chassis and mains earth but before you connect any power to this module, use your multimeter to check that there is no connection between the output ground (pins 4,5,6 or 7) and the chassis or mains ground.
Note that you should still have a connection between the chassis and mains earth!
|
| Site menu
Page menu
|
|
|
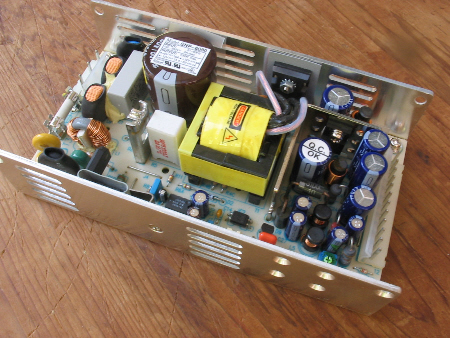
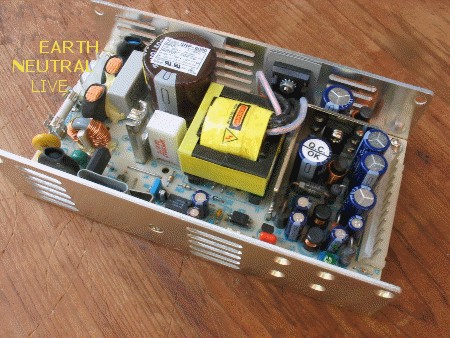
The Skynet 8080 SMPS module (this is what you get).
A suitable housing for these modules is box AB15 from Maplin (order code XB71N). Another SMPS user, Ryan Shuck, has reported that the Hammond cases sold by Maplin (order code N85AL) are also a good size for the Skynet 8080's.
You can see from the label that this module will work with input voltages of 100 to 250 volts AC.
Ok, if this has whetted your appetite (and it should have done), and you would like to try the SMPS route for yourself, here's the good news.
|
|
Decibel Dungeon has access to a limited number of these Skynet 8080 units at the (much) reduced price of 22UKP (+P&P) per pair. Please note that the price has increased (from 28-01-06) but these units are still under a third of what they cost to have made!
|
|
The units will be supplied in pairs, with a maximum order of five pairs per person. They will come unmodified, ie they will need modifying as described above to isolate the outputs from mains earth (but only if you want to use them for the +/-24 volt supply). If you don't feel confident enough to do this modification, I will modify a pair of units for and extra 5UKP.
|
|
The total cost for one pair (ie 2 modules) including the shipping charges depends on where you want them delivered to:
|
For all UK destinations
|
29 UK pounds
|
|
For all European destinations
|
31 UK pounds
|
|
For all other destinations
|
35 UK pounds
|
|
Currency converter
|
|
The above prices are doubled for two pairs (four) modules) unmodified. Payment by  please (contact me for payment details) please (contact me for payment details)
There is no cost saving in shipping four modules together. In fact it costs more than shipping them in pairs.
Also please note that I will only sell these in pairs. It is just not worth the time and effort of packing a single module and taking it to the post office!
|
|
Remember, if you can live with a +/-12 volt supply then you can get away with one pair. If you require a +/-24 volt supply, you will need two pairs (ie four modules).
|
|
To put the price in context, compare the cost of four modules against the cost of building a regulated +/-24 supply using a toroidal transformer, rectifier bridges, smoothing capacitors, regulators etc.
|
|
Please note I do not currently have any SMPS for sale. If I get some more, I will remove this note and reinstate the contact button. Please do not write and ask me for them, instead look on Ebay to see if there are any for sale there.
|
|
|
|
IMPORTANT -please read.
First off, I am selling quite a few of these SMPS to relative beginners in DIY hi-fi, primarily to use with their class-T amplifiers. So, in the interests of safety, I must point out that the SMPS generate much higher voltages than a standard PSU with the same output voltages. For this reason, it is doubly important to adhere to all the safety precautions. Make sure you never touch any part of the SMPS while it is connected to the mains. Put it in a good casing and earth (ground) the casing if it is metallic.
|
|
I have been contacted by an SMPS expert who says he can help improve the sound using these supplies. Unfortunately, he is about to move house so we will have to wait for his help but he has offered the following advice:
One note of caution - most power supplies require a minimum load on the main output (5V in your case) - indeed some PSUs fail to start up (or even
blow up!) without one. It seems like you've been ok so far, but (perhaps
surprisingly) it would improve long-term reliability to draw maybe half an amp from the 5
volt output - perhaps using a 10 ohm, 5W wire wound resistor. Doing this should
improve the regulation of the other outputs, and might alter the sound quality...
That's a 10 ohm, 5 watt resistor across pins 1 and 4 of each of the Skynet 8080 modules! I have found the 5 watt resistor gets very hot so an 11 watt type may be better. One of those aluminium clad types will be even better! I also prefer to connect the load resistors using some short lengths of wire to minimise the heat that may travel back to the soldered pins of the SMPS. In fact, it is a good idea to invest in a matching Molex KK connector!
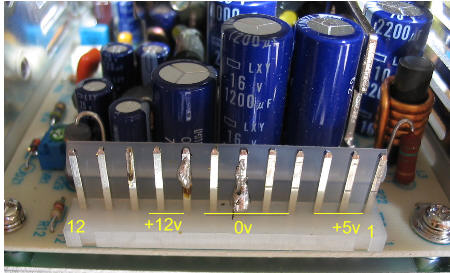
The voltage output pins (numbered from right to left). Pin 10 is -12v, pin 11 is -5v and pin 12 is another 0v.
|
|
Update 27th September 2005
I have now tried these SMPS with the four class-T amplifiers that I have been reviewing for TNT. I tried them with four different types of power supply and the SMPS was clearly the best supply. Others using the class-T amplifiers have confirmed that this is not my imagination.
|
|
I am also reviewing a NOS DAC and the other day found that the battery PSU (recommended by the supplier) was discharged. Rather than wait for it to recharge, I tried one of the SMPS and was astounded at the improvement. This will be my choice for DAC supplies from now on! The manufacturers of the DAC tells me that they are also developing an SMPS for both their DAC, and class-T amplifier!
|
|
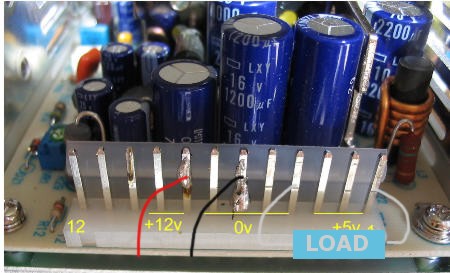
Just another few words regarding the load resistor on the 5 volt output. Another one of my expert friends has had a good look at the Skynet 8080 module and he also recommends keeping close to the 10 ohm resistor so that it draws around 1 amp. I have found the modules to work fine with a 1K resistor that obviously runs a lot less warm but I respect my friend's advice enough to take it seriously. I shall be buying some of those aluminium clad resistors with my next Farnell order! (eg Farnell order code 306-3604).
|
|
Please note - if you are using the SMPS with a class-T amplifier, you don't need to convert the SMPS (other than add the load resistor) and you use one module per amplifier (as they use only single rail supplies). You will still have to order a pair of SMPS as I will only sell them in pairs.
|
|
Skynet 8080 SMPS module showing mains connections.
Skynet 8080 SMPS module showing wiring for use as 12 volt supply.
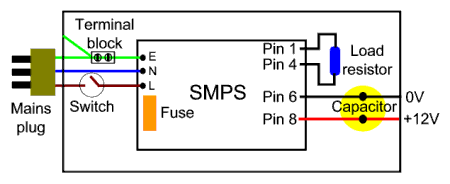
Skynet 8080 SMPS module in a case showing wiring for use as 12 volt supply (Class-T amp, DAC etc). A single pole mains switch is shown but you can use a double pole if you wish to switch the neutral connection too. If a metal case is used, it too should be connected to mains earth as shown. The fuse shown is already included on the SMPS PCB.
|
| Site menu
Page menu
|
|
|
